AI Spec-Driven Development with Kiro and Other Agentic IDEs
Learn how AI Spec-Driven Development tackles Context Drift and raises the quality of AI-assisted development with Kiro and agentic IDEs
AI Spec-Driven Development is a very powerful software development process that brings predictability to the usually chaotic world of prompt-driven AI development.
Prompt-driven development inherits many of the problems and challenges of Vibe Coding, and no matter how diligent we are, the experience tends to degrade quickly, piling up errors in a downward spiral that ends in frustration and wasted time.
In this article we’ll see why most of these problems come from a lack of context and structure in the initial prompts, and how a workflow that starts from the Software Specification delivers much better results, with higher quality, while actually speeding up the process.
Where the Problems Start
When you least expect it, things start going wrong and we end up spending more time fixing the AI’s mistakes than building new things. Often there’s an illusion of accelerated productivity, when in reality it’s six of one, half a dozen of the other.
One source of problems, especially in longer development sessions, is the tendency of many LLMs to lose performance as the conversation goes on.
This phenomenon is known as Context Drifting (or Context Rot) and has been the subject of intense study. This “drift” can happen in several ways, including error accumulation and LLM context saturation.
graph LR
    subgraph "📈 AI Performance Over Time"
        A[🚀 Start<br/>High Performance] --> B[📊 Development<br/>Stable Performance]
        B --> C[⚠️ Degradation<br/>Context Drift]
        C --> D[❌ Problems<br/>Accumulated Errors]

        A -.-> E[💡 Rich Context<br/>Clear Prompts]
        B -.-> F[📝 Information<br/>Piling Up]
        C -.-> G[🔄 Saturation<br/>Context Bloat]
        D -.-> H[🚫 Hallucinations<br/>Unpredictability]
    end

    subgraph "🔧 Solutions"
        I[📋 Spec-Driven<br/>Development] --> J[✂️ Divide and<br/>Conquer]
        J --> K[🔄 New Session<br/>Clean Context]
        K --> L[📚 Structured<br/>Context]
    end

    D --> I

    style A fill:#2d5a2d,stroke:#4a7c4a,stroke-width:2px,color:#ffffff
    style B fill:#5a4a2d,stroke:#7c6a4a,stroke-width:2px,color:#ffffff
    style C fill:#5a5a2d,stroke:#7c7c4a,stroke-width:2px,color:#ffffff
    style D fill:#5a2d2d,stroke:#7c4a4a,stroke-width:2px,color:#ffffff
    style I fill:#2d4a5a,stroke:#4a6a7c,stroke-width:2px,color:#ffffff
    style J fill:#4a2d5a,stroke:#6a4a7c,stroke-width:2px,color:#ffffff
    style K fill:#2d5a4a,stroke:#4a7c6a,stroke-width:2px,color:#ffffff
    style L fill:#4a4a4a,stroke:#6a6a6a,stroke-width:2px,color:#ffffff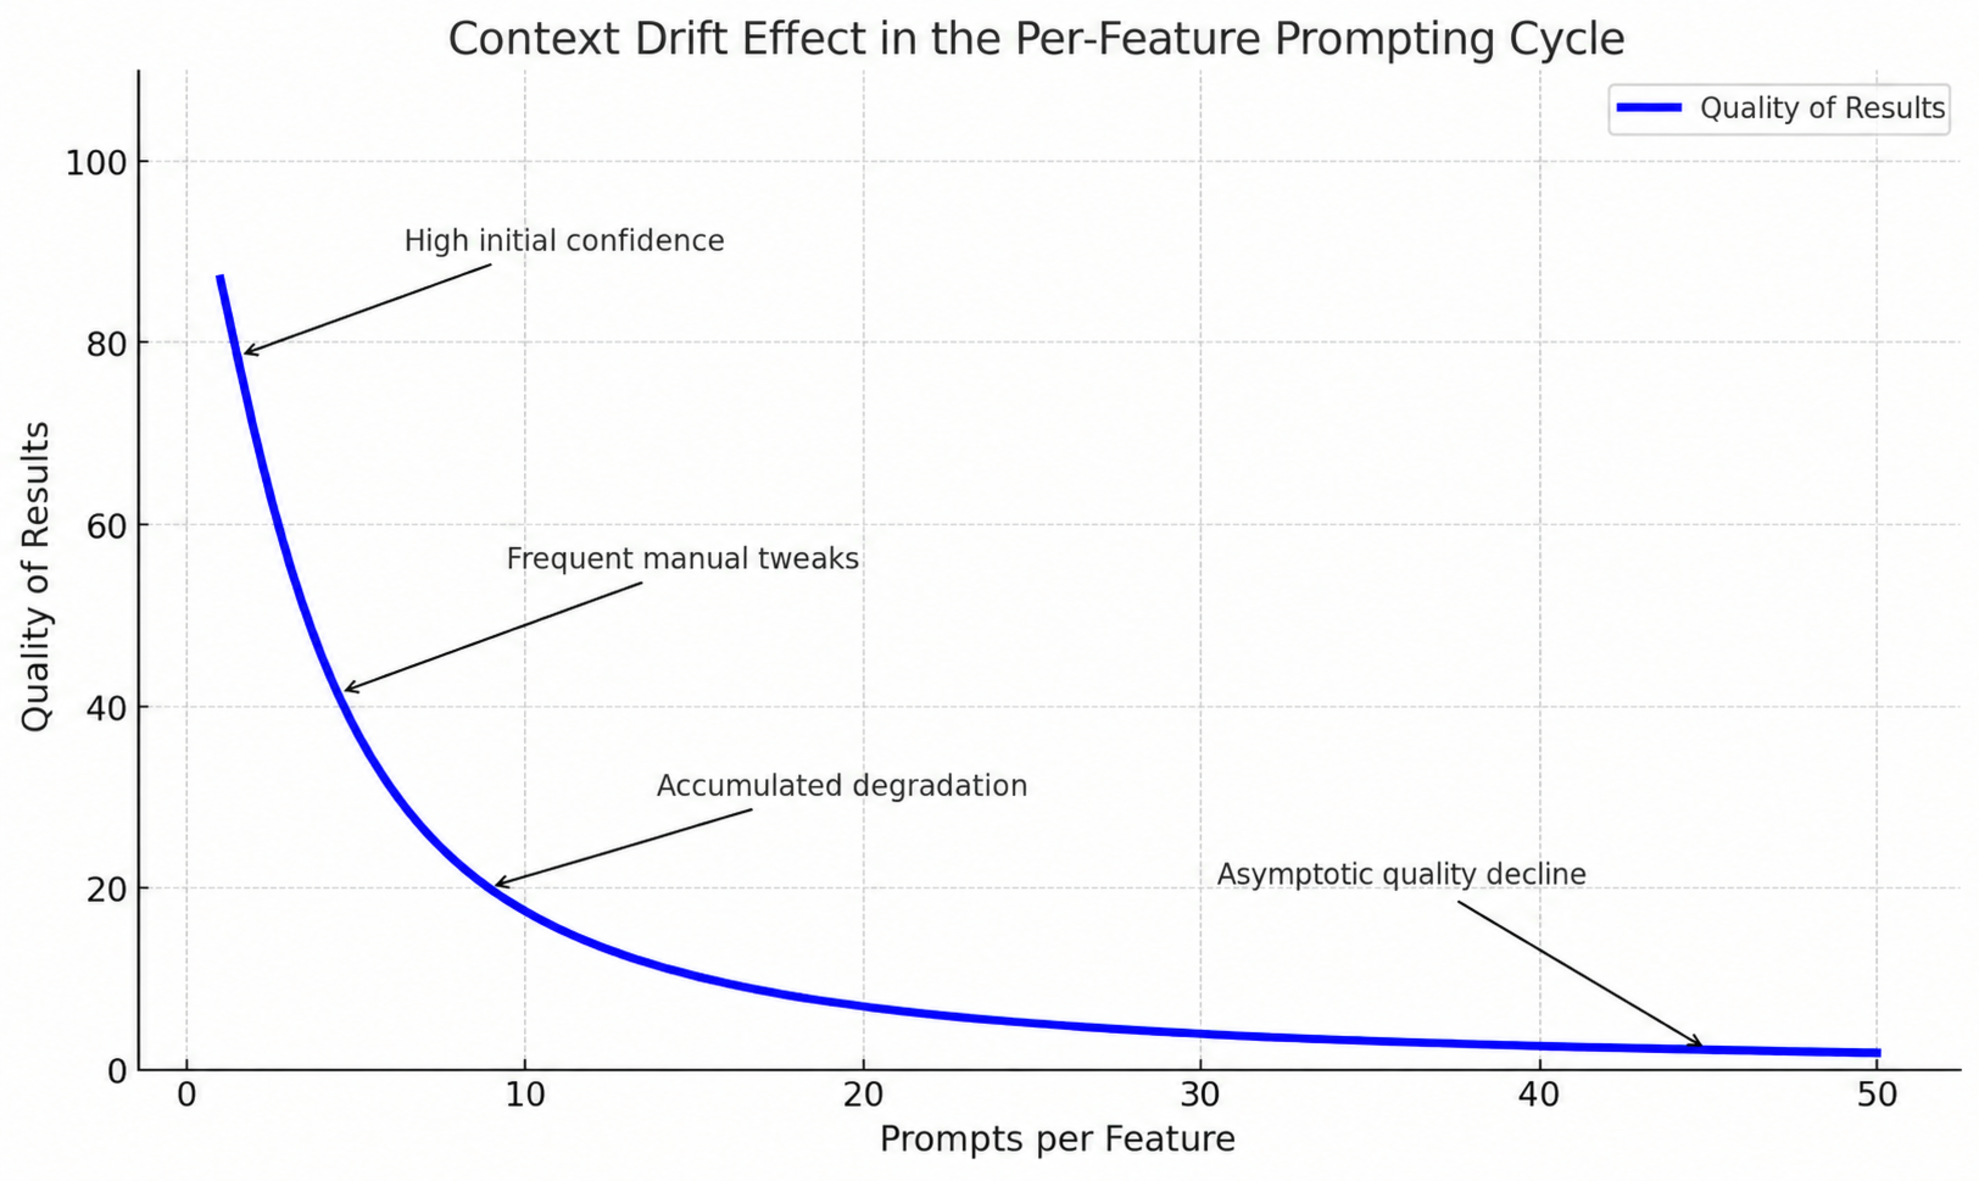
Drift from Error Accumulation
Natural language is how we interact with coding agents in IDEs like Cursor and Claude Code. But while natural language lowers the barrier to entry for programming, it introduces considerable interpretability challenges that formal programming languages never had.
In other words, a large share of accumulated errors comes from communication problems: whatever is expressed poorly and imprecisely in the prompt, and especially everything that’s left out and will be missed later.
So, more than ever, we need to be good communicators. We need to remember that effective communication isn’t about what was said, but about what was understood.
LLM Context Saturation
Every current LLM has a context window it can work with. Even though they have a clear limit, like 128K tokens for OpenAI’s GPT-4o or 2 million tokens for Google’s Gemini 1.5, these models start to lose performance as the context fills up with more information, a phenomenon known as Context Saturation (or Context Bloat).
The table below shows where performance starts to degrade for several models:
| Model | Maximum Context Window | Where Significant Degradation Starts |
|---|---|---|
| Claude 3.7 Sonnet | 200,000 tokens | 60,000 ~ 80,000 tokens (practical usability) |
| OpenAI GPT-4o | 128,000 tokens | Visible degradation after 64,000 – 100,000 tokens |
| Gemini 2.5 Pro | 1,000,000 tokens | 200,000 ~ 400,000 tokens (average) |
This degradation can show up in several ways, such as:
- Forgetting information that was already settled, like ignored requirements
- More frequent hallucinations
- Unpredictable agent behavior
Some “context-hungry” tools, like Cline, can fill the context fast, quickly reaching unpredictable scenarios that look a lot like long sessions. They do this by adding lots of files to the context to try to get high-quality results quickly, at the cost of faster context degradation.
Recommendations to avoid context saturation problems:
- Apply the Divide and Conquer strategy: small, well-defined tasks produce better results, and this is one of the strengths of Spec-Driven Development, as we’ll see below.
- Start a new conversation with the agent as soon as you can, avoiding staying too long in the same session and mixing topics
Architectural Drift
Known as Architectural Drift, this is a phenomenon that stems from the problems above. With poor context, the model becomes blind to certain architectural patterns, and the generated implementations drift further and further from the established patterns, causing all kinds of problems and a lot of rework.
Error accumulation, in turn, leads to potentially bizarre implementations, completely incompatible with a production system.
Spec-Driven Development
The Spec-Driven Development methodology took shape a few years ago with the goal of creating a development process in which the software specification is treated as the single source of truth, and all development flows from it. API specifications with OpenAPI (formerly known as Swagger) are often used as the reference specification, especially in businesses whose APIs are part of the Core Business.
The OpenAPI specification and other technologies clearly describe many important aspects of a system:
- They describe a REST API in well-structured JSON or YAML files
- They define every API endpoint and available operation (GET, UPDATE, PUT, PATCH, DELETE)
- A clear description of each operation’s inputs and outputs
- A description of the authentication methods
- Documentation of other aspects, such as license and terms of use
On top of that, a formal specification lets you build automated pipelines that produce several kinds of valuable artifacts:
- Online Playground
- Code Samples
- Test Suites
- Collections for Postman or Insomnia
- OpenAPI documentation (which can be exported to) Clear, standardized documentation of the system’s functions, parameters, and return values
- Automated generation of client SDKs
Put simply, every new piece of development starts by updating the technical documentation and having the whole team review it, and only then moves on to implementation. This creates a cycle that keeps the documentation always up to date, builds alignment across the team, and produces software that more faithfully reflects the specification.
flowchart TD
    A[📋 Update Technical Specification] --> B[👥 Team Review]
    B --> C{✅ Approved?}
    C -->|No| A
    C -->|Yes| D[💻 Development]
    D --> E[🧪 Testing]
    E --> F{✅ Tests Passed?}
    F -->|No| D
    F -->|Yes| G[🚀 Deploy]
    G --> H[📊 Monitoring]
    H --> I[🔄 Feedback & Improvements]
    I --> A

    style A fill:#e1f5fe
    style B fill:#f3e5f5
    style D fill:#e8f5e8
    style E fill:#fff3e0
    style G fill:#fce4ec
    style H fill:#f1f8e9
    style I fill:#fafafa
When the process starts from the technical specification, we can also call it Tech Spec-Driven Development, since its focus is on the technical spec:
- OpenAPI Specification
- Architecture Diagrams
- Database Diagrams
- Others
But the specification can also start from Functional and Non-Functional Requirements, as well as User Stories, as we’ll see next.
AI Spec-Driven Development
As we’ve seen, prompt-driven development tends to fall short of expectations for anything non-trivial. This can be mitigated or reversed by applying good Prompt Engineering techniques.
But beyond prompt engineering techniques, which keep growing in popularity and sophistication, one approach that has proven very effective at improving results is separating the Planning and Execution phases.
And that’s where Spec-Driven Development shines! Applied to development with AI agents, we can build a workflow that promotes the agent from a simple coder to co-author of the requirements, of the application’s technical and architectural development, of the design, and then of task planning and tracking. These elements provide clear structure and enrich the context available to the agent, while keeping the developer in control at all times and letting the team review and refine the plan before a single line of code is written.
flowchart TD
subgraph "🤖 AI Agent Evolution"
A[📝 Simple Coder<br/>Prompt → Code] --> B[📋 Requirements Co-author<br/>User Story Analysis]
B --> C[🏗️ Technical Co-author<br/>Architecture & Design]
C --> D[📊 Planning Co-author<br/>Tasks & Estimates]
D --> E[🔄 Tracking Co-author<br/>Monitoring & Refinement]
end
subgraph "👥 Human Control"
F[👨💻 Developer<br/>Always in Control] --> G[👥 Team<br/>Review & Refinement]
G --> H[✅ Approval<br/>Before Implementation]
end
subgraph "📚 Enriched Context"
I[📋 Technical Specification] --> J[🎯 Functional Requirements]
J --> K[⚙️ Non-Functional Requirements]
K --> L[👤 User Stories]
L --> M[🏛️ Architecture Diagrams]
end
E -.-> F
H --> A
M -.-> C
style A fill:#ffebee
style B fill:#e3f2fd
style C fill:#e8f5e8
style D fill:#fff3e0
style E fill:#f3e5f5
style F fill:#fafafa
style G fill:#f1f8e9
style H fill:#e0f2f1Kiro’s Approach
Amazon recently launched a new IDE based on Visual Studio Code called Kiro. It’s still in preview, and its main differentiator is the option to develop using Spec mode.
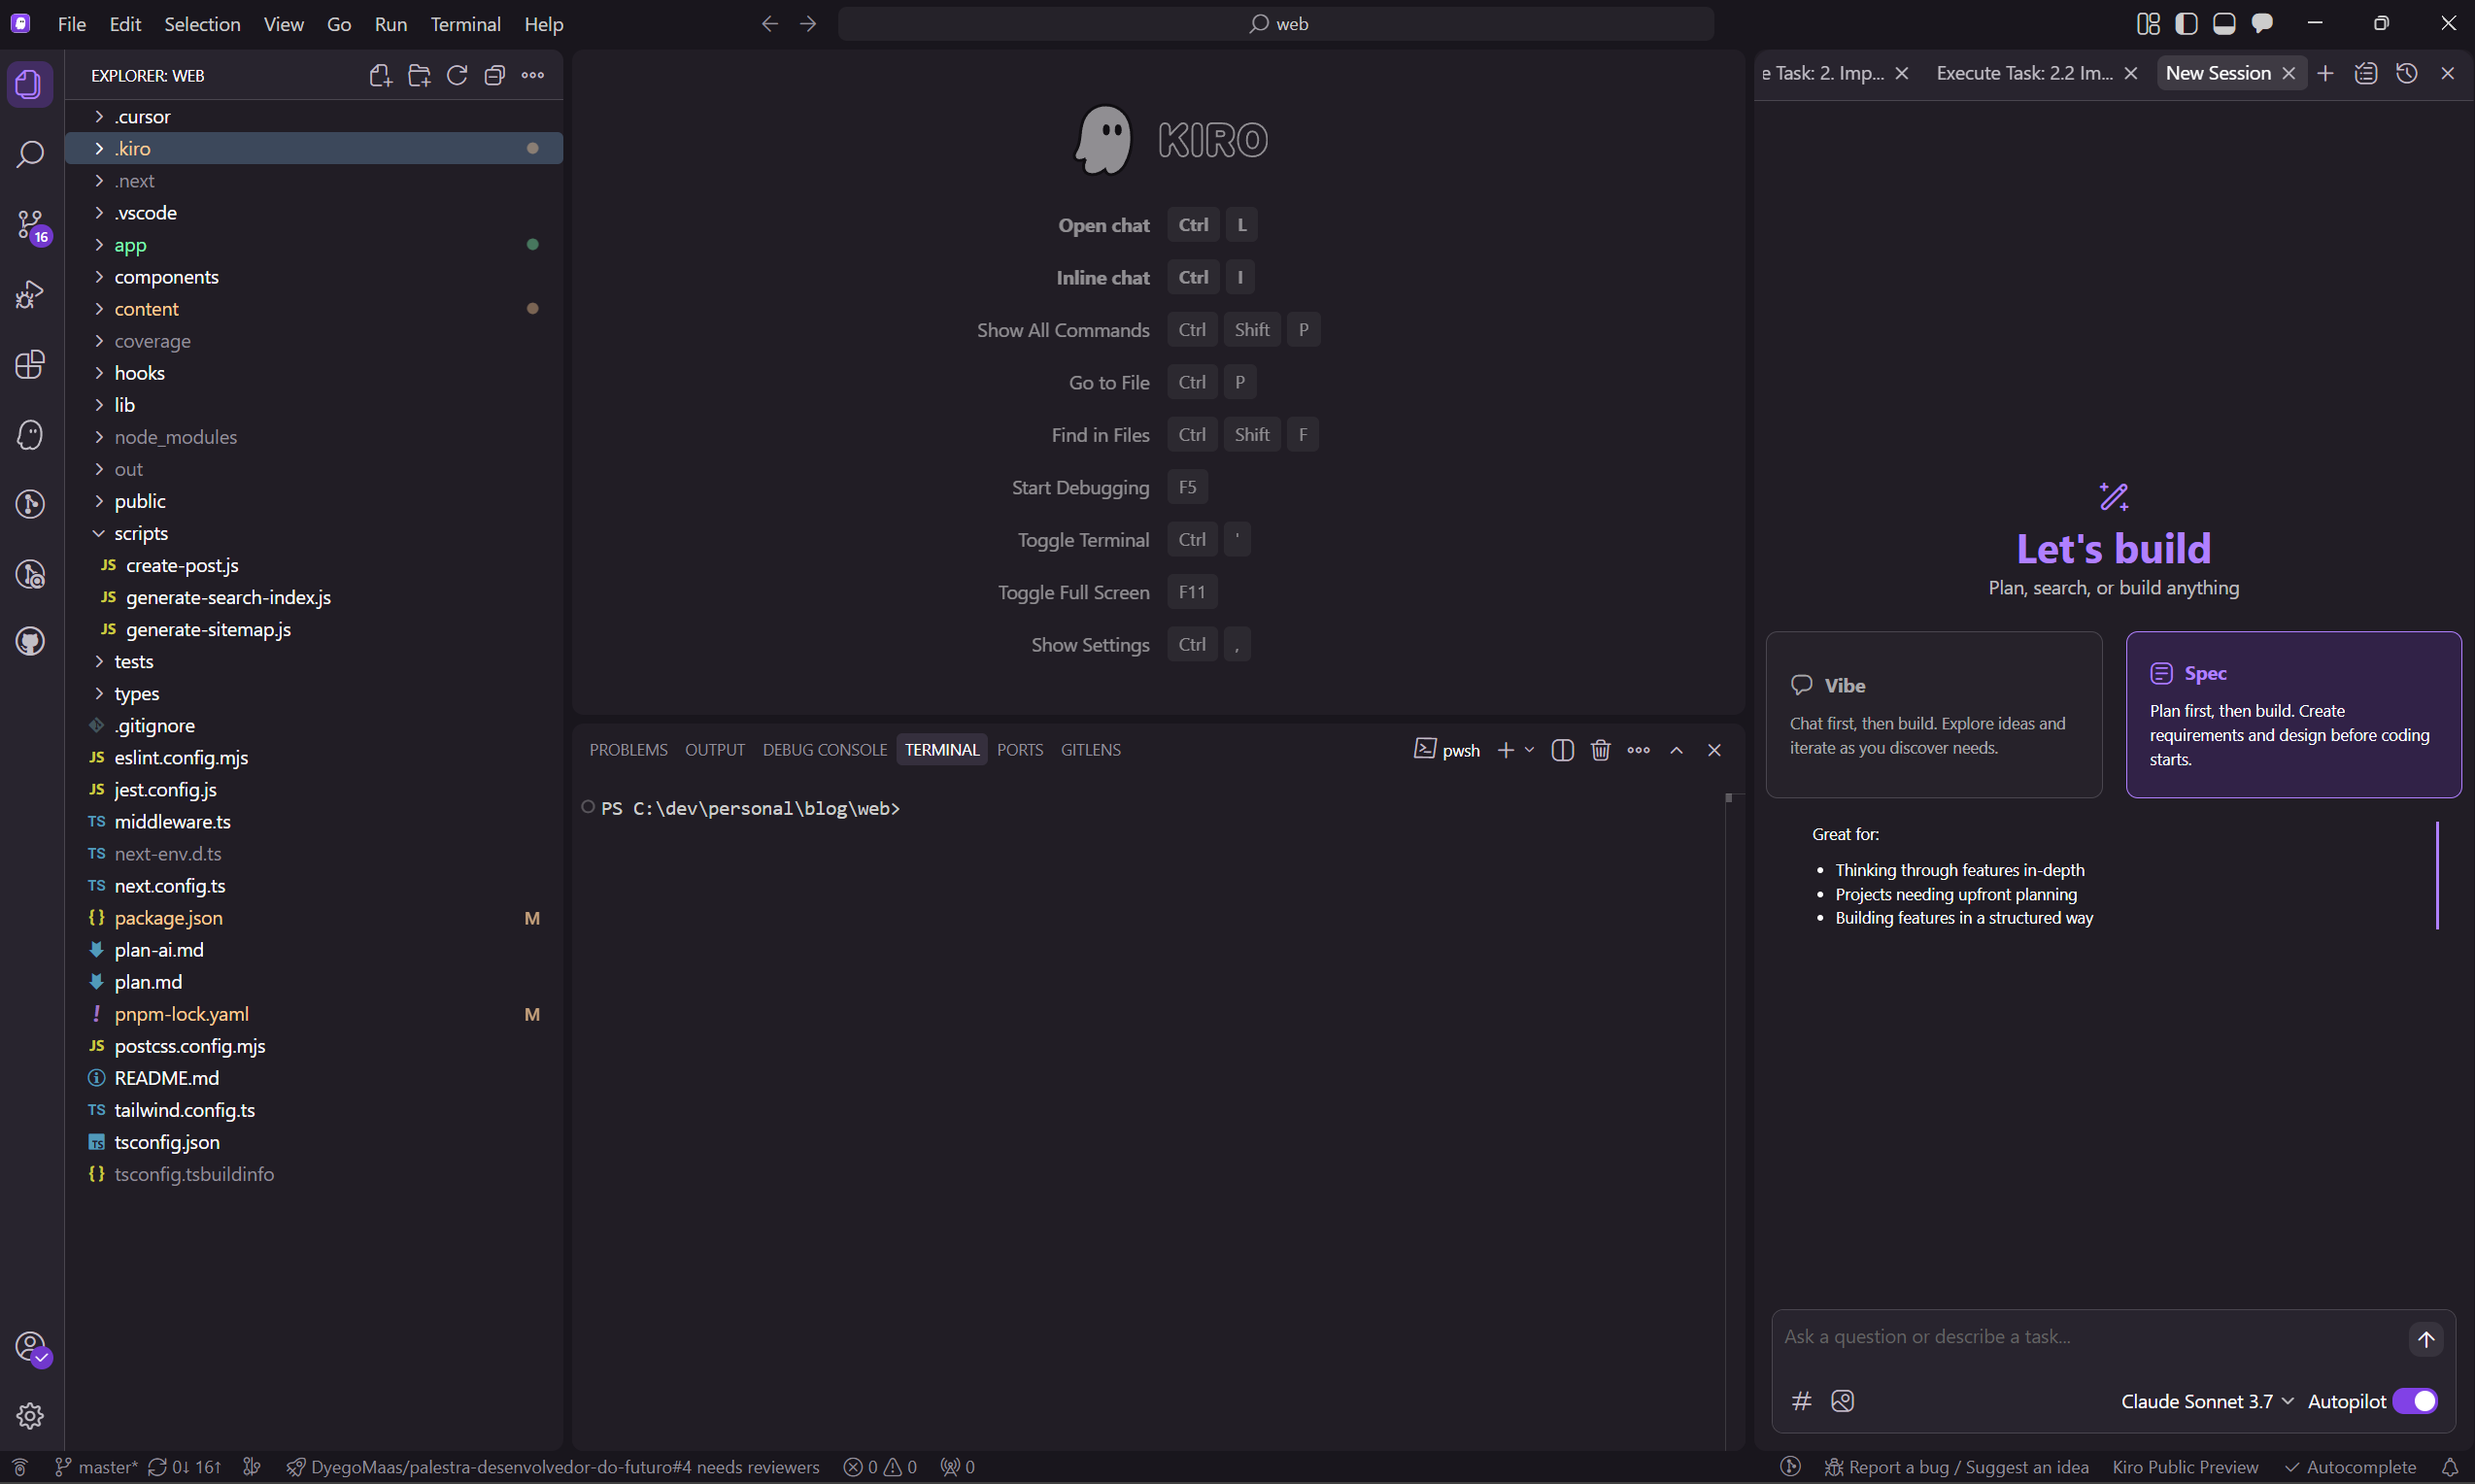
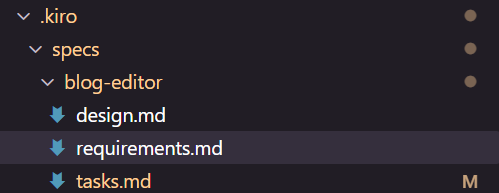
When we describe what we want to achieve in Spec mode, Kiro creates the specification in a .kiro/specs directory and gives the spec a name. In the example below, a specification called blog-editor was created.
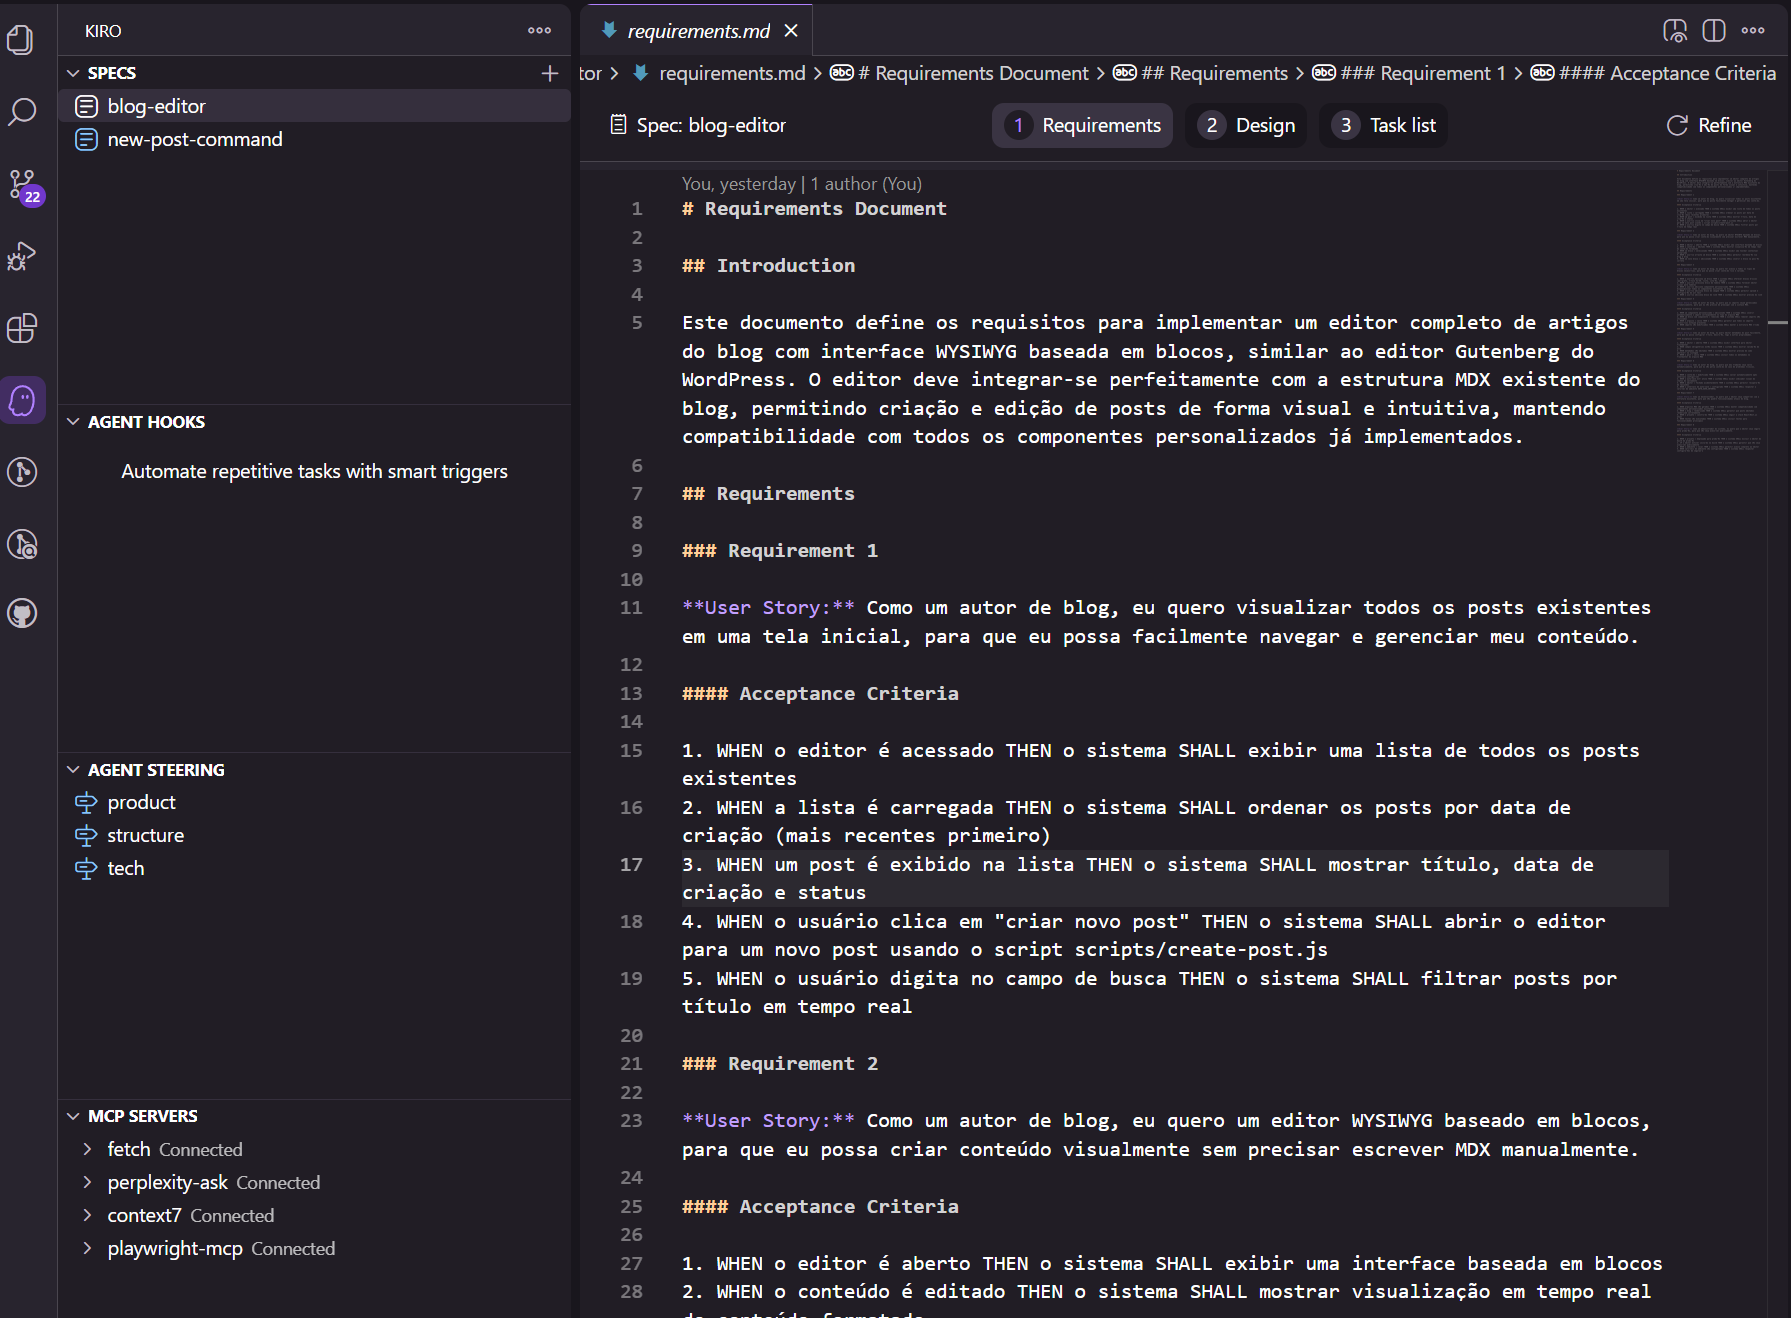
The requirements specs Kiro generates follow the EARS format (Easy Approach to Requirements Syntax). They include an introduction to the feature specified in the document, followed by a list of requirements. Each Requirement, in turn, has two parts: a User Story and a list of Acceptance Criteria, as you can see in the image above.
Here’s an example of a Requirement in EARS format, as implemented by Kiro:
### Requirement 1

**User Story:** Como um autor de blog, eu quero visualizar todos os posts existentes em uma tela inicial, para que eu possa facilmente navegar e gerenciar meu conteúdo.

#### Acceptance Criteria

1. WHEN o editor é acessado THEN o sistema SHALL exibir uma lista de todos os posts existentes
2. WHEN a lista é carregada THEN o sistema SHALL ordenar os posts por data de criação (mais recentes primeiro)
3. WHEN um post é exibido na lista THEN o sistema SHALL mostrar título, data de criação e status
4. WHEN o usuário clica em "criar novo post" THEN o sistema SHALL abrir o editor para um novo post usando o script scripts/create-post.js
5. WHEN o usuário digita no campo de busca THEN o sistema SHALL filtrar posts por título em tempo real
These requirements can be refined by the developer, with or without the agent’s help, versioned, and shared with the team, making the process truly collaborative. The same goes for the design and task files.
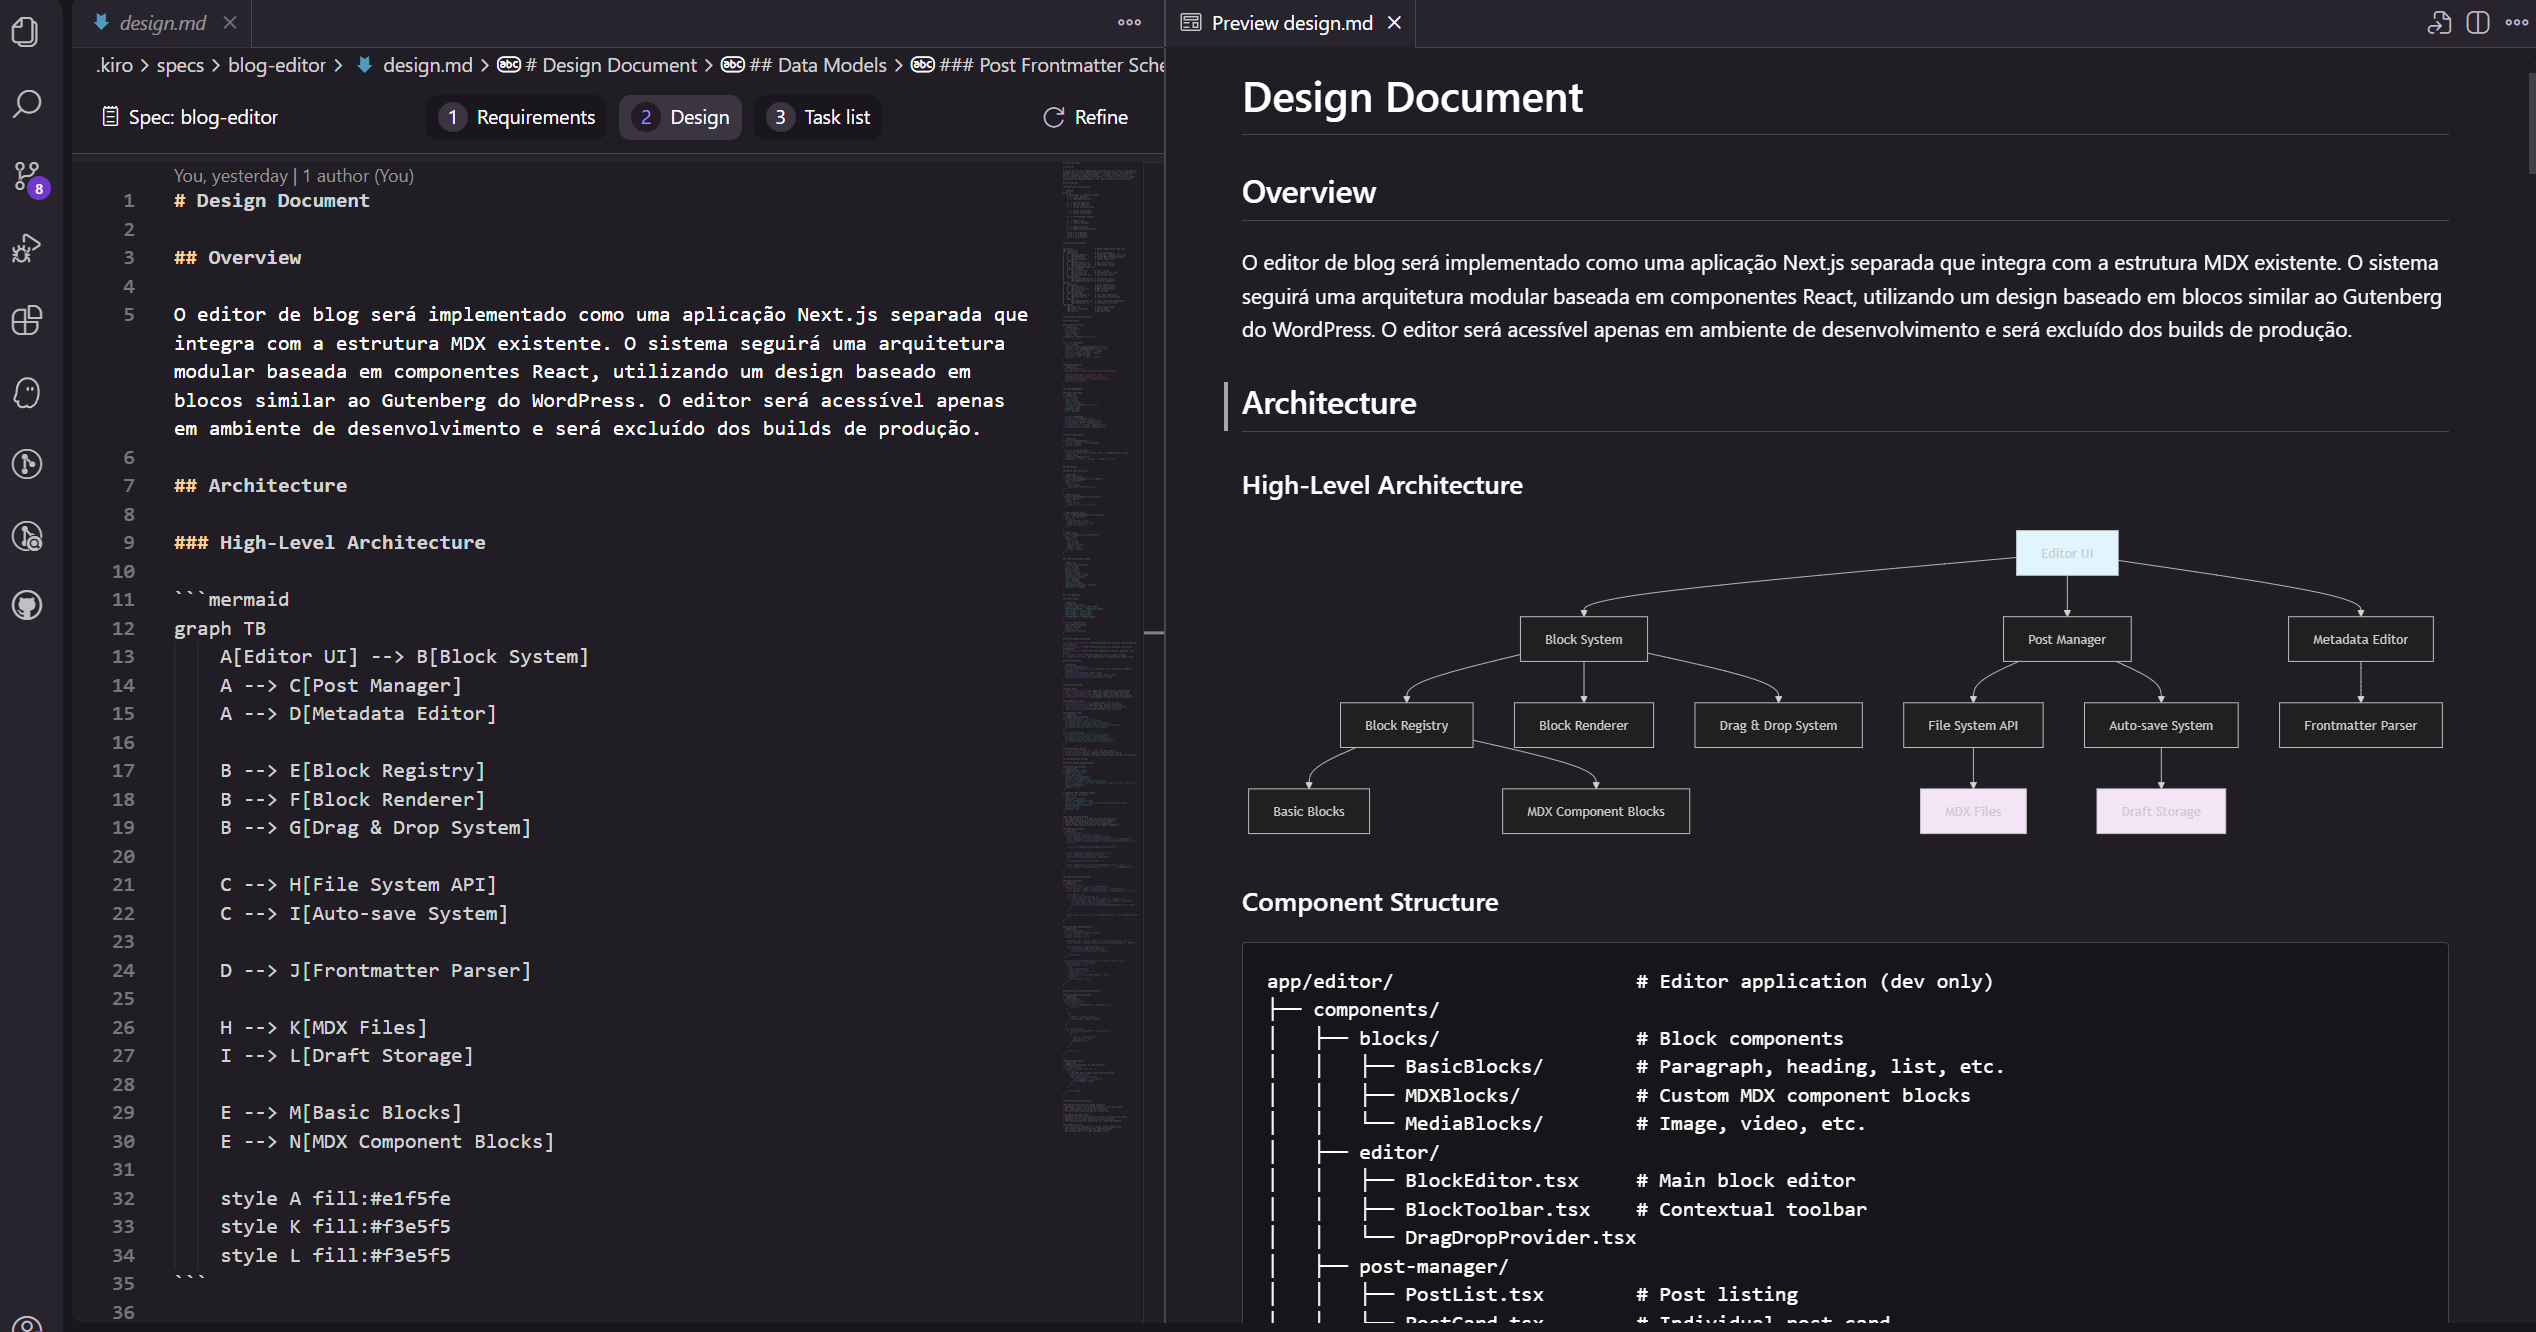
Once we tell Kiro the requirements are well defined, we move on to the next phase of the process: Design. This is where the design and architecture of the solution get worked out. What shows up in this step depends a lot on what’s being built, but it usually covers topics like:
- Application architecture
- API and database contracts
- Testing strategy
- Frameworks and libraries
- Security considerations
- Interfaces and Contracts
- Others
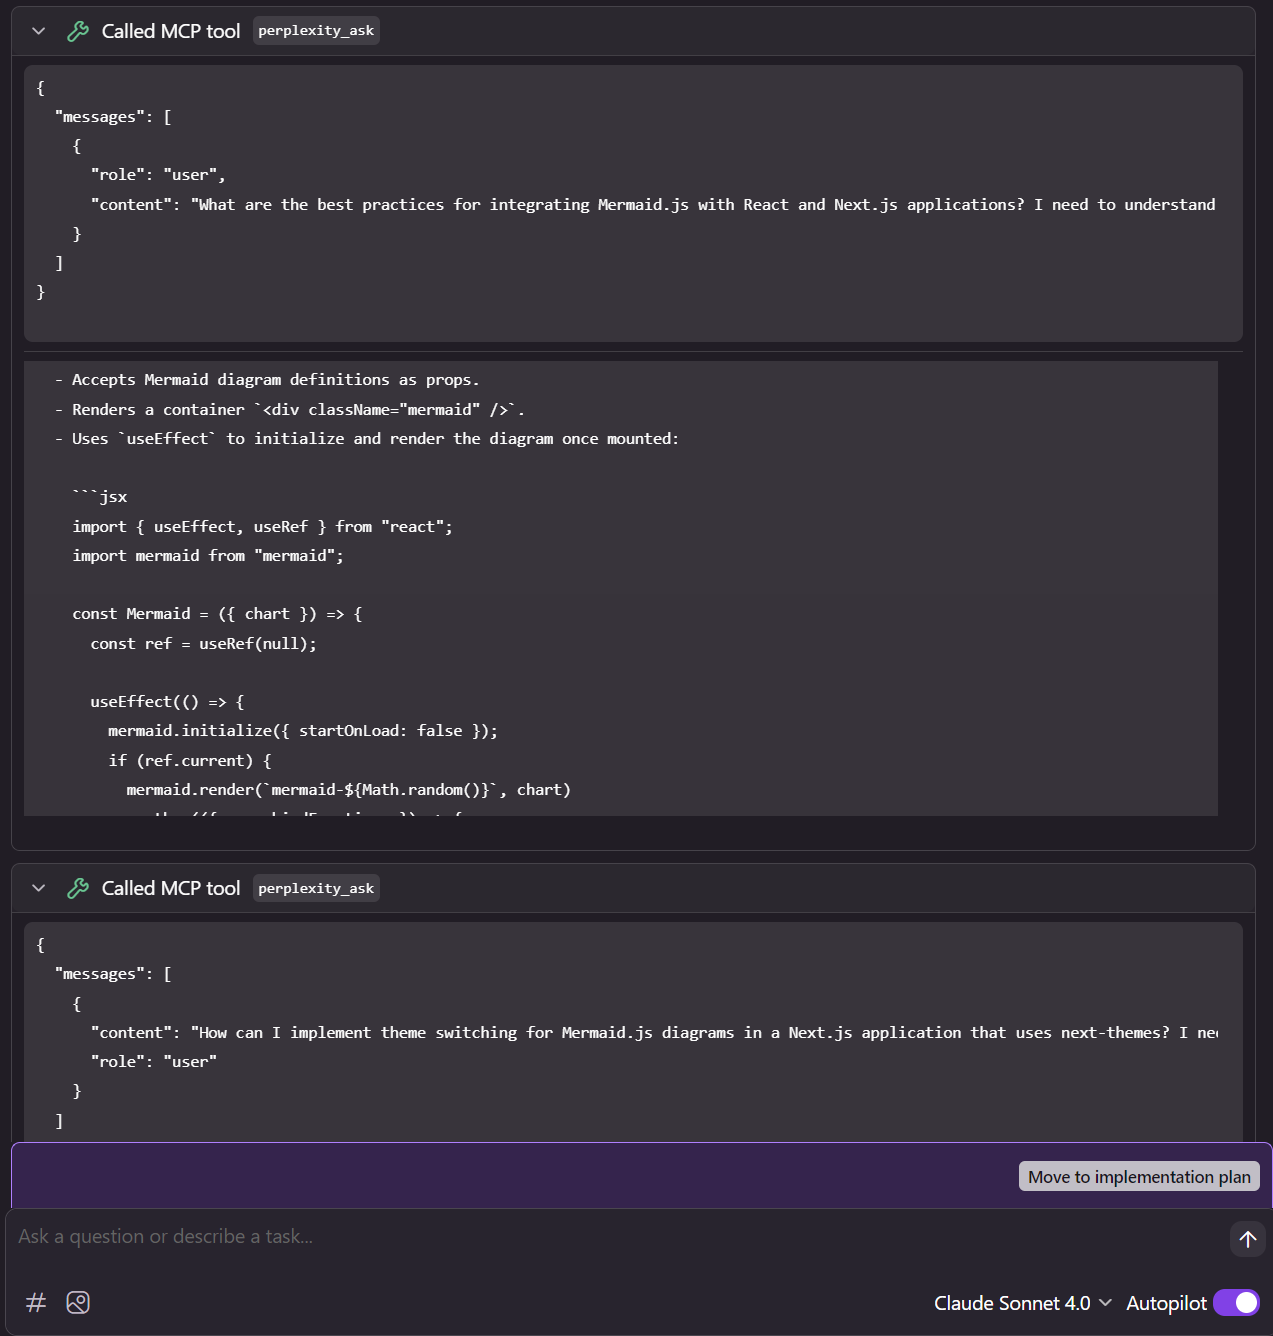
Since Kiro supports MCP servers, it can also use them during the design phase. In my case, it often uses Perplexity to research best practices for implementing a given kind of feature.
Once refined, we move on to creating the tasks, which aim to capture both the requirements and the design details of the solution. The tasks are ordered so that the requirements are built up gradually toward completion.
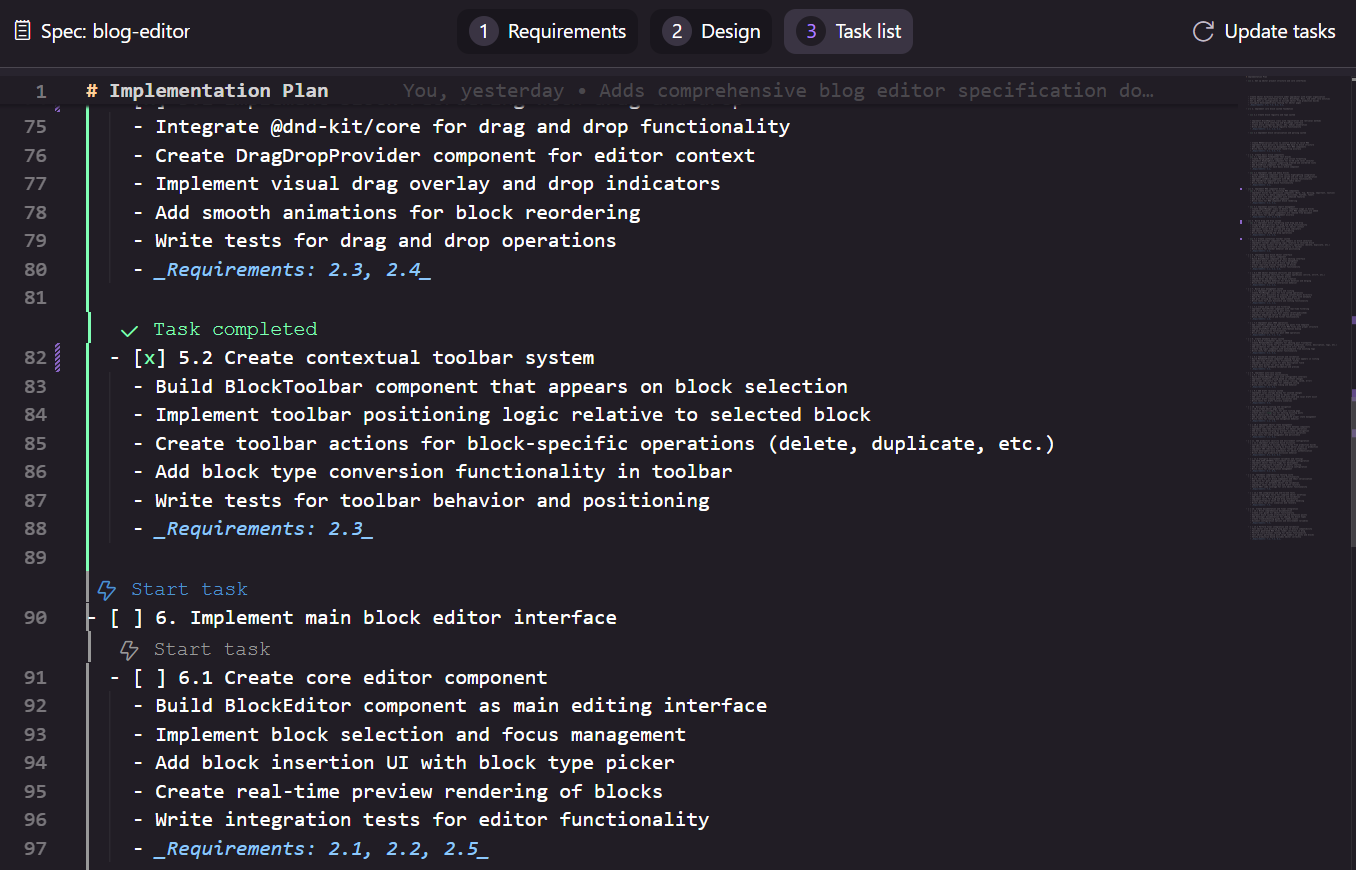
One feature I really liked is the task triggers. Clicking one spins up a new agent with the context needed to execute it. It also gives us the freedom to choose the order in which tasks run, which doesn’t have to be sequential.
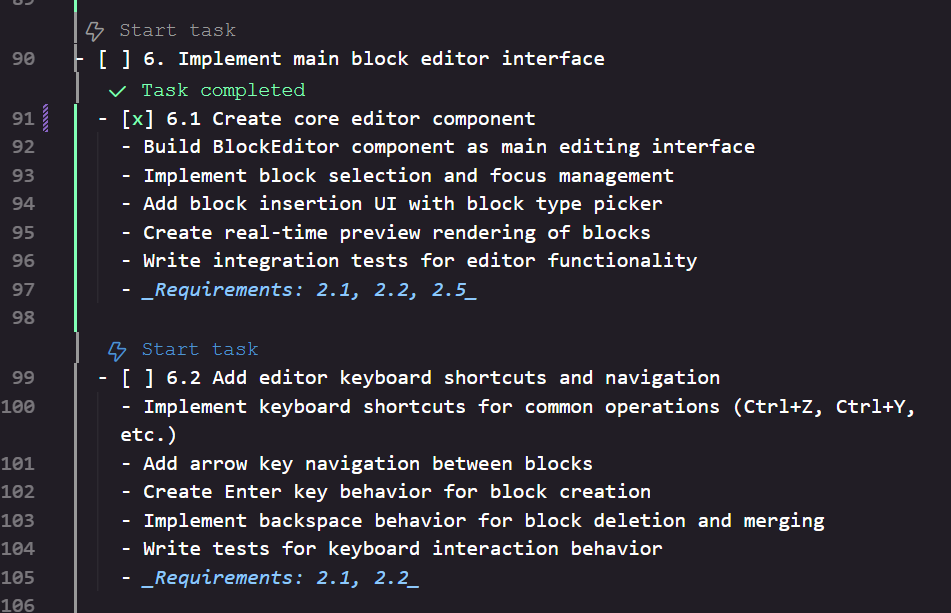
Dica
With the full specification in place, with requirements, design, and tasks written down, execution can happen in other tools. I tried this approach with Augment Code, but it would also work in Cursor, Windsurf, Cline, Claude Code, Gemini CLI, and other tools.
Just use a prompt similar to this one:
Implemente o item 6.1 do @.kiro\specs\blog-editor\tasks.md.
Referências: @.kiro\specs\blog-editor\design.md  @.kiro\specs\blog-editor\requirements.md.
Marque a tarefa como concluída ao final.
Spec-Driven in Other Tools like Cursor
Even though other agentic IDEs don’t have this Spec-Driven Design workflow built in, we can create very similar workflows using the features these IDEs offer.
Some tools, like Cursor and Cline, let you create what are called Custom Modes. A “Custom Mode” is an agent configuration that lets us create behavior completely different from what most people experience with the Default Agent.
A Custom Mode lets you create an agent with its own characteristics:
- A System Prompt guiding its behavior
- The LLM model
- Native tools available to the agent (reading, writing, and deleting files, )
- Available MCP servers
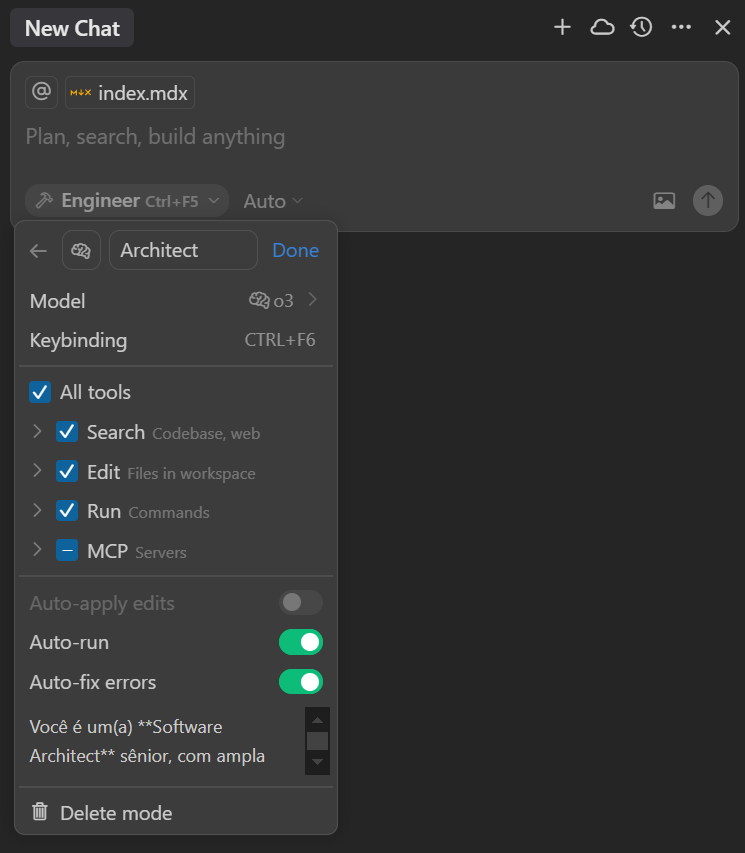
We can think of custom modes as Personas, each with a specialized role. I usually use modes like Architect and Engineer to run a Spec_Driven Development workflow.
The Architect (or Planner) wraps the three steps of the Spec_Driven Development process into a single custom mode. To build this cycle, I use a few strategic settings:
- MCP tools for research, like Perplexiy and Context7.
- A shortcut to trigger the agent
- A Reasoning Model that performs well at planning, like OpenAI’s
o3. - A System Prompt that describes the method and is driven by the agent, with the goal of discussing and gathering requirements, proposing architectural options, discussing and drafting the development design, and finally planning the implementation. And best of all, all of this builds up a
plan.mdfile that can be reviewed and versioned, and at the end, aplan-ai.mdfile, which is the input for the Engineer agent.
So whenever I start building a new feature in Cursor, I select the Architect agent to run a detailed planning process. After iterating on and refining the plan, I switch to the Engineer agent to move on to development.
In other tools that don’t have custom modes, we can adapt these system prompts into custom commands (/plan and /dev) or custom rule files (.cursorrules, .clauderules, etc.) selected manually in the prompt.
In those cases, our prompt would look something like @plan.md Vamos planejar a criação de um editor WYSIWYG para o blog....
Conclusion
We can use Spec-Driven Development to raise the quality of our work, bringing predictability and good results to AI-assisted software development.
We can use the features of the new agentic IDEs, like custom modes or rule files, to encode these workflows in natural language. That way we can create dynamics that keep the developer at the center, countering the tendency to sideline the developer that happens with these tools’ default agents, which charge ahead implementing without asking questions and leave the developer in the background.
In my courses and workshops, I teach how to build and use effective Spec-Driven Development workflows to boost the productivity and quality of AI-assisted development.