Continuous delivery for Hugo blogs with GitHub Actions
Learn how to streamline the publishing workflow of your Hugo blog using continuous delivery with GitHub Actions to automatically update your page on GitHub Pages.
Hugo is one of the best and most popular static site generators around today. GitHub Pages, in turn, offers an excellent free service for hosting static content, which is perfect for blogs. So it’s only natural that the two tools are often used together.
Once the blog is fully set up, with all the templates customized the way we want, day-to-day blogging starts to revolve around creating content.
There are many ways to work, but any workflow you choose will have a minimum set of common steps:
- Create new content (posts, articles, images, etc.)
- Run the
hugocommand with some parameters to generate the updated static content - Publish the new static content to the
<nomeusuario>.github.iorepository
The rest of this article covers setting up a workflow with GitHub Actions to automate generating and publishing the static content. By the end, we’ll have a continuous delivery process for our blog.
Our setup will look like this: Commit to master -> GitHub Actions workflow -> github.io blog updated
The only action needed will be a commit to the master branch containing the desired changes. I’m using this workflow and find it very easy and practical.
The tutorial below assumes you’re using two repositories:
- A repository with the Hugo template and the content
- The
<nomeusuario>.github.iorepository
And all you need to do to implement it is follow the steps below.
Setting up the CI/CD workflow with GitHub Actions
Until a few days ago, I had never worked with GitHub’s CI/CD tools. But GitHub Actions turned out to be pretty easy to learn, especially if you already have some experience with CI/CD tools like Circle CI or Travis.
GitHub Actions calls pipelines workflows. To create a new workflow, you first need to create the following directory structure at the root of your blog’s repository (where your template lives):
.github/workflows
Inside it, you’ll add a workflow file. It can have any name, and must end with the .yml or .yaml extension.
Below is the workflow I’m currently using on my blog, already commented. You can also download it here.
name: Deploy para <nomeusuario>.github.io
on:
push:
  branches:
    - master # only commits to the master branch trigger deploys
# It can also run a deploy automatically every day
# to publish scheduled posts (with future dates)
schedule:
  - cron: '0 8 * * *' # 08:00 am UTC

jobs:
# The "build" job is responsible for downloading the template and hugo,
# and compiling the static site
build:
  name: Gerar conteúdo estático
  runs-on: ubuntu-latest
  steps:
      # First, we check out the repository
    - uses: actions/checkout@master
      # Then we use an action to clone the theme repository
      # Replace the address and directory with ones of your choice
    - name: Atualizar template
      uses: "srt32/git-actions@v0.0.3"
      with:
        args: "git clone https://github.com/htr3n/hyde-hyde.git themes/hyde-hyde"
      # Lets you install any hugo version you need
    - name: Setup Hugo
      uses: peaceiris/actions-hugo@v2
      with:
        hugo-version: '0.69.0' # if you want the latest, you can use 'latest'
        extended: true # allows compiling SCSS and SASS
    - name: Build
      run: hugo # generates the static files
      # This action uploads the /public directory as an artifact
      # of the "build" job
    - name: Upload dos artefatos
      uses: actions/upload-artifact@v1
      with:
        name: public
        path: ./public
publish:
  name: Publish to <nomeusuario>.github.io
  runs-on: ubuntu-latest
  needs: build # the "publish" job only runs if everything went well in "build"
  steps:
      # First we check out our github.io repository
      # into the static-site directory
    - uses: actions/checkout@v2
      with:
        repository: '<nomeusuario>/<nomeusuario>.github.io'
        # token with the required permissions
        token: ${{ secrets.CD_BLOG_TOKEN }}
        path: static-site
      # We download the artifacts from the "build" job into the
      # /public directory
    - name: Download dos artefatos
      uses: actions/download-artifact@v1
      with:
        name: public
      # We copy the new static files from /public to /static-site
    - name: Aplicar atualização
      shell: bash
      run: |
        cp -r ./public/* ./static-site
      # We add the changes and create a commit
    - name: Commit files
      run: |
        cd static-site
        git config --local user.email "<email-valido>"
        git config --local user.name "GitHub Action - Deploy"
        git add .
        git commit -m "Add changes" -a
      # Finally, we need to push to the target github.io
      # repository
    - name: Push changes
      uses: ad-m/github-push-action@master
      with:
        repository: '<nomeusuario>/<nomeusuario>.github.io'
        github_token: ${{ secrets.CD_BLOG_TOKEN }}
        directory: static-site
You’ll need to replace a few variables in the template, such as <nomeusuario> (your username), <email-valido> (a valid email), and the template being used.
You may also have noticed that we need a GitHub token in two places, as in this line: github_token: ${{ secrets.CD_BLOG_TOKEN }}. Generating and registering this token is very easy.
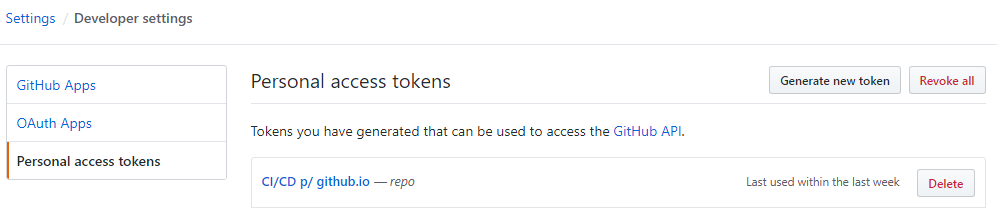
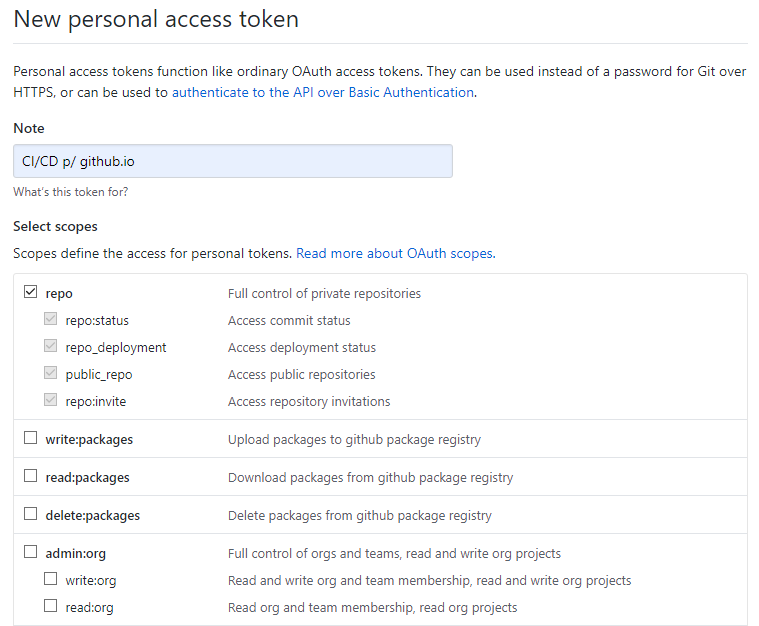
Enabling only the “public_repo” option will probably work, but I haven’t tested it. If you want to try it, feel free to leave a comment saying whether it worked.
Once that’s done, click Generate token and a screen will open. Save this token, it’s important. Now we need to create a Secret in our repository.
Go to your repository’s settings, and in the Secrets section, register a secret named CD_BLOG_TOKEN, with the token as its value.
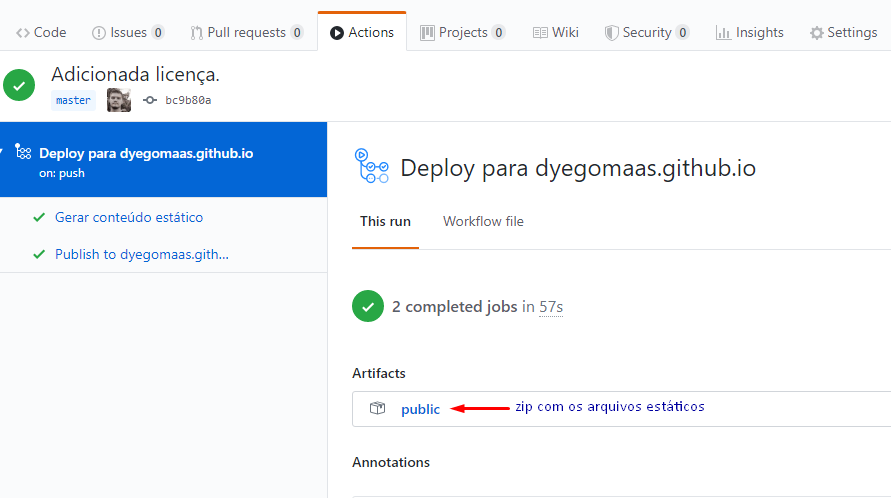
Once that’s done, just commit to master and the workflow will be triggered. You can follow the result under Actions:
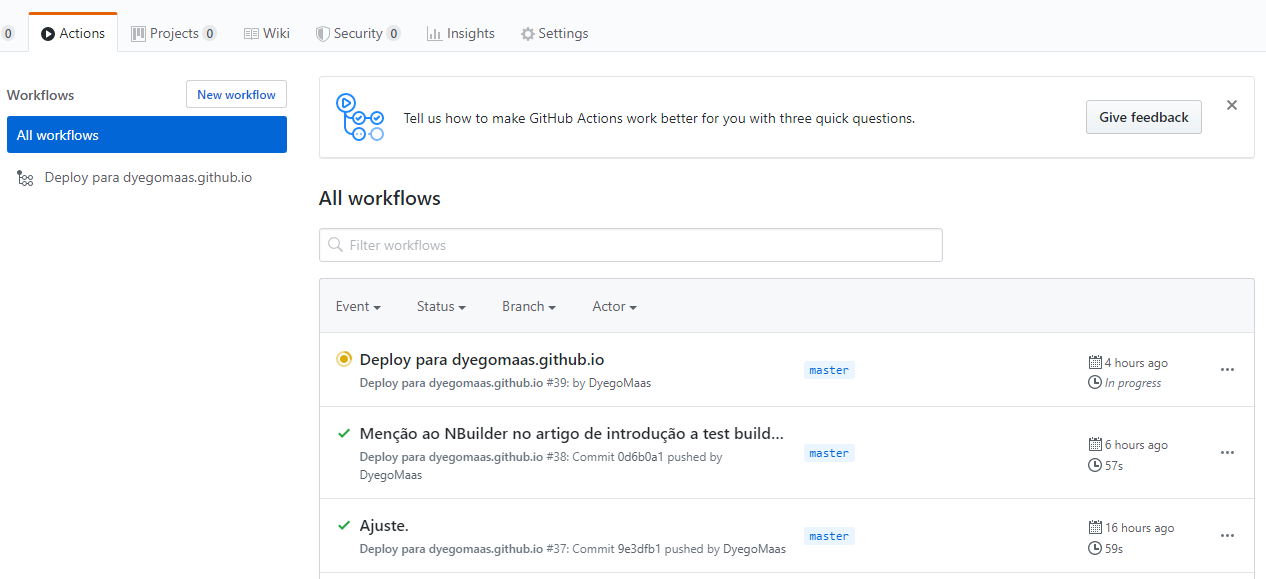
If everything goes smoothly, you’ll see all jobs succeed and your blog will be up to date.
Scheduling posts
This approach also enables automatic publishing of scheduled posts. The answer is at the top of the workflow. We can set up a schedule with a simple cron expression, like this one:
schedule:
- cron:  '0 0 5 * *'
This expression describes the deploy frequency as follows:
┌───────────── minute (0 - 59) │ ┌───────────── hour (0 - 23) │ │ ┌───────────── day of the month (1 - 31) │ │ │ ┌───────────── month (1 - 12 or JAN-DEC) │ │ │ │ ┌───────────── day of the week (0 - 6 or SUN-SAT) │ │ │ │ │ │ │ │ │ │ │ │ │ │ │
So our expression 0 0 5 * * means the workflow should be triggered every day of every month, at 5 a.m.
In our posts’ front matter, we need to set the publishing date:
+++
author = "John Connor"
title = "Post agendado para o futuro longínquo"
date = "2032-07-03"
+++
If we publish this future-dated post to the master branch, by default Hugo won’t include it when generating the site. The workflow will run every day at 5 a.m. until July 3, 2032, the date scheduled for this post, and from that day on it will be included in the published site.
Working with branches
Finally, this approach also lets us write posts in individual branches without marking them with draft = true. I create branches in the format post/nome-do-branch. When a post is ready, just merge it into the master branch and the process will be triggered.
And that’s it. I hope these tips are useful. And if you use some other strategy or have a useful tip, share it in the comments.