
Mutation testing with Stryker.NET
Learn how to use mutation testing to assess the quality of a test suite. In this article, I show how to use Stryker to improve the tests of C# applications.
Software development today demands moving fast. Our products need to change almost as quickly as our customers’ behavior and demands. We need to be able to run. To ship fast and fail fast. To learn from our mistakes and move on. And the only safe way to move on at a breakneck pace is to move on with quality.
Unit tests are one of the main tools developers have to ensure quality. When done right, they give us the confidence to make significant changes without fear of breaking other parts of the software.
In some kinds of projects, we need a way to assess whether our test suites are good enough. We want a number, an indicator that the team is writing tests consistently. So we use code coverage analysis tools.
And these give us the coveted magic number: the Code Coverage Percentage. The team sets a goal: 70% coverage by the end of the year. A bolder team working on an open-source project might decide they need to keep it at 100%.
But sometimes these same teams notice that despite having 80 or 90% coverage, the software falls short on quality and is full of bugs. Sometimes they realize the number is an illusion, and that coverage percentage is not a reliable indicator of quality.
The problem with code coverage
To understand this problem, we need to look closely at what code coverage analysis actually analyzes.
Take, for example, the following function, which determines whether a person is in the risk group for a disease based on their age:
public bool FaixaRisco(int idade)
{
  if (idade >= 18 && idade < 35)
      return true;
  else
      return false;
}
As we can see above, it’s a very simple function that flags people between 18 and 35 years old as being in the risk group.
Let’s imagine the developer who implemented this routine wrote the following tests:
[Fact]
public void Deve_identificar_que_a_pessoa_esta_na_faixa_de_risco()
{
  FaixaRisco(idade: 20).Should().BeTrue();
}

[Fact]
public void Deve_identificar_que_a_pessoa_esta_fora_da_faixa_de_risco()
{
  FaixaRisco(idade: 15).Should().BeFalse();
}
The tests pass and the code moves on. Maybe the pull request gets approved and the branch is merged into master. The build worked, the tests passed, and the routine’s code coverage was 100%, which can create a sense of safety, since quality must be high.
Coverage reached 100% because of the criterion used to calculate it. It’s based on the percentage of branches executed by the test suite.
if (idade >= 18 && idade < 35)
  return true; // branch 1: hit by the test with age *20*
else
  return false; // branch 2: hit by the test with age *15*
There are other kinds of code coverage, such as function, loop, and statement coverage, but all of them would have gotten us to 100% in the specific case above.
We can already start to see why this assessment strategy says nothing about the correctness of the code. All it guarantees is that there are tests exercising certain pieces of code. The quality of those tests is not assessed.
Not long after the code hits production, the team finds that 35-year-olds are being left out of the risk group. They review the business rule with the Business Analyst, and it was clear: People aged 18 to 35 must be considered in the risk group. We have a bug.
At this point, it should be clear that a high code coverage percentage guarantees that our tests execute the code and exercise certain combinations of scenarios.
What it doesn’t guarantee is that the right scenarios are being tested. Sometimes our test suites are poor, full of tests that don’t guarantee much. But how can we test the quality of a test suite?
That’s where mutation testing comes in.
Mutation testing
Mutation testing has been around for a long time. The concept emerged in the late 1970s, but until a few years ago its focus was almost entirely academic. Today, though, there are solid tools for most major programming languages.
But what exactly is mutation testing? And how does it work?
To answer those questions, we first need to know two hypotheses on which the concept of mutation testing is built.
The first is the Competent Programmer Hypothesis, which states that most faults introduced by an experienced programmer are due to small syntactic errors.
The second is the Coupling Effect Hypothesis. According to it, simple faults like the ones described by the previous hypothesis can cascade or couple, producing new errors.
So, by association, we can conclude that complex errors are formed by a combination of simple errors through the Coupling Effect. And it’s in detecting these small syntactic errors that mutation testing does its job.
The general idea is quite simple: the tool uses a process called a mutator to introduce a syntactic error into the code, producing a mutant, that is, a faulty variation of the original code. It repeats this process many times, producing many mutants, each with its own single change.
A mutant can be something as simple as swapping a logical operator:
if (a == b)
  return;

// can become

if (a != b)
  return;
That gives us a collection of mutants. Next, for each mutant, the tool runs our test suite and evaluates the results.
The logic is very simple: if any test failed, the mutant was killed and we don’t need to worry about it. If no test failed, the mutant survived.
The following diagram may help visualize this process:
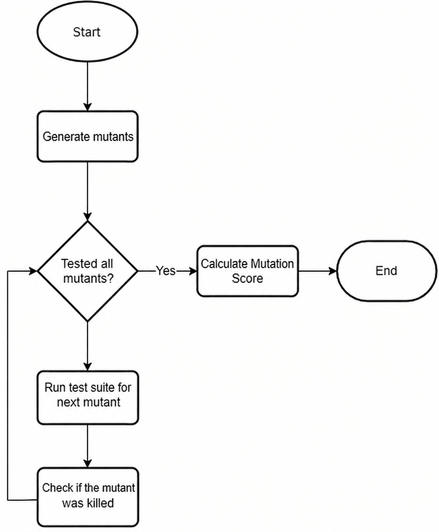
At the end of the process, the tool generates a report detailing which mutants were killed and which survived. This report includes a very important metric: the Mutation Score.
Mutation Score
Based on the ratio of killed to surviving mutants, the metric is calculated with the following formula:
Mutation Score = Killed mutants / Total mutants
So if we kill eight out of ten mutants, we get a score of 80%.
It’s worth noting that some studies point to a correlation between faults found by mutation testing and real faults, but few are based on really large numbers of real programs to prove the correlation is actually significant. Even so, these tests can help us far more than code coverage.
Mutators
As we briefly saw above, a mutator is a process responsible for producing a specific syntactic mutation in the target code, and mutators come in all sorts of flavors, varying by tool and programming language.
As an example, here are some of the changes the Stryker tool can make to C# programs on .NET Core:
| Original | Mutated |
|---|---|
| a + b | a - b |
| new Array(1, 2, 3, 4) | new Array() |
| *= | /= |
| true | false |
| while (a > b) | while (false) |
| “John Doe" | "" |
| a++ | a— |
| a == b | a != b |
| a && b | a |
| OrderBy() | |
| Max() | Min() |
Say() { Print('Hi!') } | Say() {} |
| "" | "Stryker was here!” |
| -a | +a |
There are many other mutators available, but this is enough to give us an idea of the kinds of mutants that will be generated.
Practical example
Let’s go back to the earlier example and see how mutation testing could help. In the version below, the bug that left 35-year-olds out of the range has already been fixed:
public bool FaixaRisco(int idade)
{
  if (idade >= 18 && idade <= 35) // fixed operator from "<" to "<="
      return true;
  else
      return false;
}
Unfortunately, the test suite didn’t change:
[Fact]
public void Deve_identificar_que_a_pessoa_esta_na_faixa_de_risco()
{
  FaixaRisco(idade: 20).Should().BeTrue();
}

[Fact]
public void Deve_identificar_que_a_pessoa_esta_fora_da_faixa_de_risco()
{
  FaixaRisco(idade: 15).Should().BeFalse();
}
Whenever we need to test a range of values, we need to focus on exercising the boundaries of that range. This applies to date ranges, value ranges, or any other range with a start and an end.
Then someone on the team sets up a mutation testing tool, and the report shows that one of the three generated mutants was killed (in reality there would be many more mutants, but we’re trying to keep things simple here).
Let’s say these three mutants were generated:
// ORIGINAL (FOR COMPARISON)
public bool FaixaRisco(int idade)
{
  if (idade >= 18 && idade <= 35)
      return true;
  else
      return false;
}

// MUTANT 1
public bool FaixaRisco(int idade)
{
  if (idade < 18 && idade <= 35)
      return true;
  else
      return false;
}

// MUTANT 2
public bool FaixaRisco(int idade)
{
  if (idade >= 18 && idade < 35)
      return true;
  else
      return false;
}

// MUTANT 3
public bool FaixaRisco(int idade)
{
  if (idade > 18 && idade < 35)
      return true;
  else
      return false;
}
The team runs the mutation tests and finds that only mutant 1 was killed. The other two are still alive to haunt the team.
What happens is that when testing “Mutant 1”, with the condition idade < 18 && idade <= 35, using the value 15, one of the tests expected the routine to report the person as outside the range, but the mutant changed the behavior. In other words, the developer got at least one thing right when writing the tests: he made sure values below the range are outside it.
The other mutants weren’t killed, because there were no tests checking the values at the boundaries of the risk range, and this is one of the scenarios where mutation testing can point out which tests are missing from our suite.
So let’s review the business rule and identify the minimum set of test scenarios needed to guarantee this routine behaves correctly:
“People aged 18 to 35 must be considered in the risk group.”
As we can see, to guarantee this routine’s correctness, we’ll need 4 tests checking the values at the boundaries of the range:
- 17 is outside the range
- 18 is inside the range
- 35 is inside the range
- 36 is outside the range
For the routine above, the following test suite would have killed every possible mutant:
[Theory]
[InlineData(18)]
[InlineData(25)]
[InlineData(35)]
public void Deve_identificar_que_a_pessoa_esta_na_faixa_de_risco(int idade)
{
  FaixaRisco(idade).Should().BeTrue();
}

[Theory]
[InlineData(17)]
[InlineData(36)]
public void Deve_identificar_que_a_pessoa_esta_fora_da_faixa_de_risco(int idade)
{
  FaixaRisco(idade).Should().BeFalse();
}
As we’ve seen, by looking at which mutants survive, we can spot holes in our test suite. Some of those holes may be sources of failures.
Mutation testing performance
There’s an important detail to consider when setting up mutation testing: performance. As mentioned above, the test suite runs once for every generated mutant.
Depending on the size and nature of the tests in our suite, running them hundreds of times can take quite a while. In some cases, it can take hours or even days.
To mitigate this, each tool has its own mechanisms to speed up the tests. Some allow running tests in parallel or use other tricks, but all of them let you narrow the scope of the tests.
We can usually restrict mutant generation to certain classes, namespaces, or packages that need more attention. These might be critical routines or the core of an application.
Another option is to run broader mutation tests on a schedule, at night or in the early morning hours.
Tools
There are several tools available. Some of the main ones are:
| Tool | Technologies |
|---|---|
| Stryker | JavaScript, TypeScript, C# and Scala |
| mutmut | Python |
| Cosmic Ray | Python |
| PIT | Java |
| Infection | PHP |
Next, let’s look at how to run mutation tests with Stryker for the example above.
Stryker .NET
To install Stryker for .NET Core globally, just run:
dotnet tool install -g dotnet-strykerThe most practical way to configure the tool is to create a stryker-config.json configuration file at the root of the test project, like this one:
{
  "stryker-config":
  {
      "test-runner": "vstest",
      "reporters": [ "progress", "html", "json"],
      "log-level": "info",
      "timeout-ms": 15000,
      "log-file": true,
      "project-file": "RiscDetection.csproj",
      "max-concurrent-test-runners": 4,
      "threshold-high": 90,
      "threshold-low": 70,
      "threshold-break": 0,
      "mutate": [
          "**/FaixaEtaria*.cs"
      ],
      "files-to-exclude": [],
      "excluded-mutations": [],
      "ignore-methods": ["ToString", "LogInformation", "LogError", "Append"]
  }
}
In the example above, we can see some useful settings:
- We can choose the most suitable test runner with
test-runner - We have several reporters available with
reporters - We can specify which source files to mutate with
mutate - We can exclude methods from mutant generation with
ignore-methods - We can exclude certain mutators with
excluded-mutations
One important detail is that the project-file field must be the file of a project referenced by the test project.
All in all, it’s worth taking a close look at the project’s documentation, as it’s packed with interesting options.
Once that’s done, just run the dotnet-stryker command from the root of the test project.
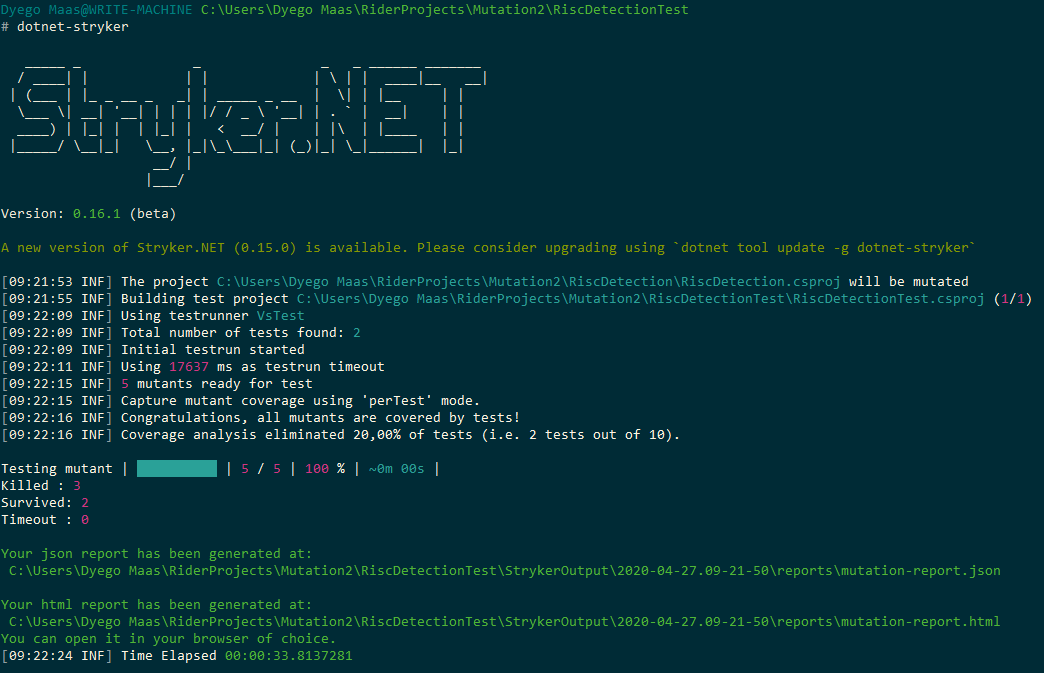
As we can see in the image above, with three reporters, we got three outputs. First, the progress report in the console itself. Then, a report in JSON format and another in HTML format.
The JSON report can be useful for processing by other tools or even for building custom views.
But the HTML report is where the real insight is.
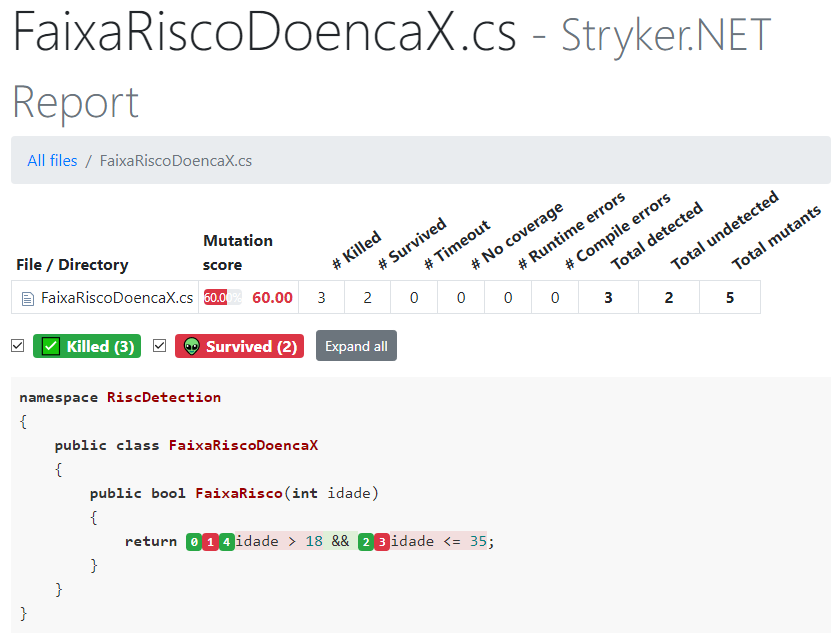
We can see which mutants were killed:
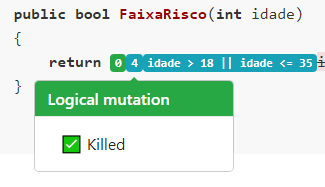
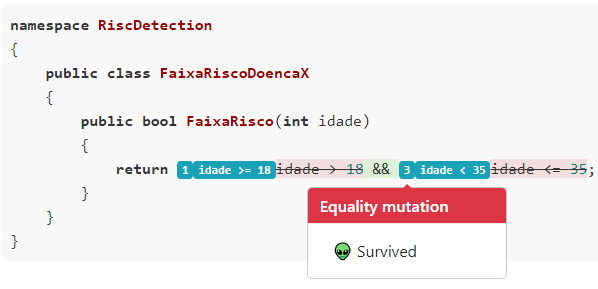
But most important are the surviving mutants, since they point to tests missing from our suite. And as we can see, they’re precisely the scenarios at the boundaries of the ranges, the spots that, according to the Competent Programmer Hypothesis, are most likely to concentrate the small problems that lead to failures in our software.
As we saw in this article, mutation testing can play a very important role, both in assessing the quality of our test suites and during development, guiding developers as they come up with new scenarios.
The examples above are super simple, but in real projects the number of scenario combinations can grow explosively, and mutation testing can be our ally in shipping with higher quality.
The code for the example above is available in a GitHub repository.