
How to implement Health Checks for your application using the ASP.NET Core 3.0 extensions
Learn how to implement Health Checks with the ASP.NET Core 3.0 extensions. Very handy for setting up Kubernetes liveness probes!
ASP.NET Core 3.0 provides a very practical way to implement an endpoint that checks an application’s health.
A well-implemented Health Check endpoint can help us keep an application running in countless ways. We can use them together with Kubernetes liveness probes, for example, so it can check a service’s health and restart it if things go wrong. Monitoring tools can also use these endpoints to generate alerts and statistics.
The Microsoft.Extensions.Diagnostics.HealthChecks package brings an abstraction that’s simple to implement and get running in the application: the IHealthCheck interface.
public class RecursoImportanteHealthCheck : IHealthCheck
{
  public Task<HealthCheckResult> CheckHealthAsync(HealthCheckContext context, CancellationToken cancellationToken = new CancellationToken())
  {
      // check the resource's health
  }
  //...
}
As we can see in the snippet above, the CheckHealthAsync method receives an object of type HealthCheckContext, representing the context of the application’s health check, and expects a result of type HealthCheckResult.
Let’s focus on the return value first, since it’s what we’ll use most often. There are three possible statuses for the check:
- Healthy
- Degraded
- Unhealthy
The Healthy status needs no explanation, since everything is OK. The Unhealthy status, on the other hand, indicates a failure and can also detail the nature of the errors found:
HealthCheckResult.Unhealthy(
  description: "detalhamento do problema",
  exception: e,
  data: new Dictionary<string, object>() {
      {"chave1", "valor1"},
      {"chave2", "valor2"},
  }
);
Since all the arguments are optional, we can build one of these responses simply like this:
HealthCheckResult.Unhealthy();The Degraded status works exactly the same way. The difference is in what it means: the resource is responding, but the quality of service is below expectations; it’s degraded.
Implementing an IHealthCheck
Let’s take as an example an integration with an external service our application depends on. Implementing a check like that can be quite simple, like the one below, which decides based on a GET request to the external service:
public class ServicoExternoHealthCheck : IHealthCheck
{
  public async Task<HealthCheckResult> CheckHealthAsync(HealthCheckContext context, CancellationToken cancellationToken = new CancellationToken())
  {
      var result = await new HttpClient().GetAsync("http://servicoX.com/api", cancellationToken);
      if (result.IsSuccessStatusCode)
      {
          return await Task.FromResult(HealthCheckResult.Healthy());
      }
      return await Task.FromResult(HealthCheckResult.Unhealthy());
  }
}
A more elaborate use case could decide whether the service’s health is degraded based on response time. For that, we can use the Stopwatch class as a timer and decide accordingly:
public async Task<HealthCheckResult> CheckHealthAsync(HealthCheckContext context, CancellationToken cancellationToken = new CancellationToken())
{
  try
  {
      var stopwatch = Stopwatch.StartNew();
      var resultado = await new HttpClient().GetAsync("http://servicoX.com/api", cancellationToken);
      stopwatch.Stop();

      var healthCheckResult = (resultado.IsSuccessStatusCode, stopwatch.Elapsed) switch
      {
          (true, var duracao) when duracao <= TimeSpan.FromSeconds(5) => HealthCheckResult.Healthy(),
          (true, _) => HealthCheckResult.Degraded(),
          (false, _) => HealthCheckResult.Unhealthy(),
      };
      return await Task.FromResult(healthCheckResult);
  }
  catch (Exception excecao)
  {
      return await Task.FromResult(new HealthCheckResult(context.Registration.FailureStatus, exception: excecao));
  }
}
The example above is very close to an implementation I did at work, and it has a few interesting details worth looking at. The first is the use of C# 8 pattern matching syntax to pick the check result based on two parameters: 1) whether the call to the external service succeeded or not, and 2) the service’s response time.
var healthCheckResult = (result.IsSuccessStatusCode, stopwatch.Elapsed) switch
{
  (true, var tempoResposta) when tempoResposta <= TimeSpan.FromSeconds(5) => HealthCheckResult.Healthy(),
  (true, _) => HealthCheckResult.Degraded(),
  (false, _) => HealthCheckResult.Unhealthy(),
};
This is a very compact way to handle every case. I like this syntax because it makes it very easy to see which combinations of inputs lead to each output. In a future post, I’ll cover C# pattern matching in more detail.
Continuing with the example, if the request succeeds (the first parameter of each tuple) and the response time is up to 5 seconds, then we consider the service healthy and return HealthCheckResult.Healthy().
If it succeeds but the response time is over 5 seconds, then we consider it too slow and return HealthCheckResult.Degraded().
If, however, the returned status code isn’t a success, we report that it’s not healthy with HealthCheckResult.Unhealthy().
Besides that, the full code further up has exception handling. It’s entirely optional. If the check throws an exception, the API will know the service is Unhealthy and will return a response accordingly.
Still, the HealthCheckResult is built a bit differently here, using the class’s own constructor:
try
{
  // ...
}
catch (Exception excecao)
{
  return await Task.FromResult(new HealthCheckResult(context.Registration.FailureStatus, exception: excecao));
}
Note that the first argument we pass is the context’s failure status. The FailureStatus property defaults to Unhealthy, unless another value is given when registering this HealthCheck. And that’s an opportunity to explore how ServicoExternoHealthCheck gets registered.
Registering a Health Check endpoint
Setting up health checks is quite simple and happens in two steps. The first is registering our implementations of the IHealthCheck interface. This is done in the ConfigureServices method of the Startup class.
public void ConfigureServices(IServiceCollection services)
{
  services.AddHealthChecks()
      .AddCheck<ServicoExternoHealthCheck>("ServicoTerceiro");
  // ...
}
At this point, we can add some extra settings to customize our health check. For example, we can define what the status will be when the check fails, as we saw a bit earlier.
services.AddHealthChecks()
  .AddCheck<ServicoExternoHealthCheck>("ServicoTerceiro", failureStatus: HealthStatus.Unhealthy);
Another option is to pass a collection of tags to be used during the service’s health check:
services.AddHealthChecks()
  .AddCheck<ServicoExternoHealthCheck>("teste", tags: new [] {"feature1", "feature2"});
Finally, in the second setup step, we need to map an endpoint to query. This is done in the Configure method, still in the Startup class:
public void Configure(IApplicationBuilder app, IWebHostEnvironment env)
{
  app.UseEndpoints(endpoints =>
  {
      // ...
      endpoints.MapHealthChecks("/health");
  });
  // ...
}
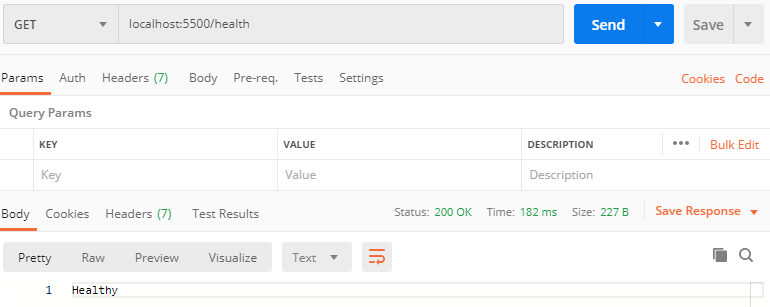
And we’re ready to test! Just start the application and make a GET request to the /health endpoint. When the status is Healthy, note that the response has HTTP Status 200 (OK):
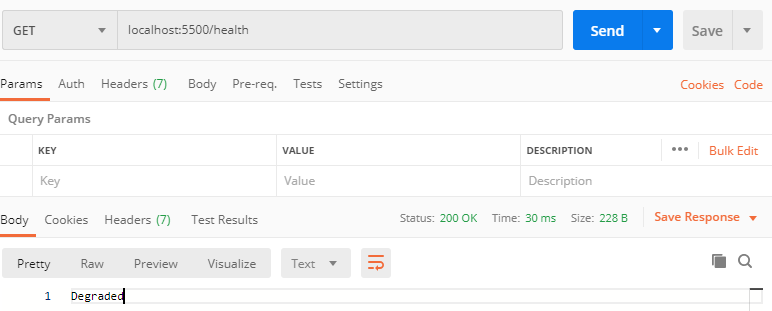
Same thing for Degraded:
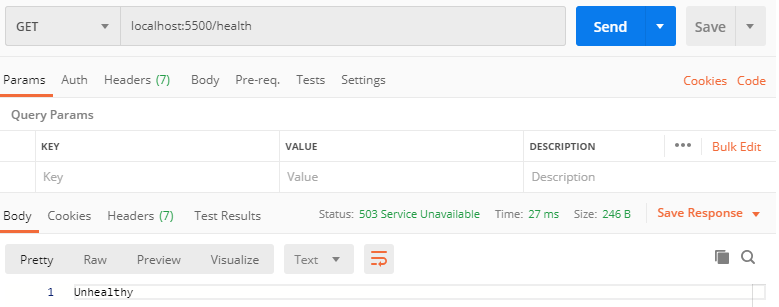
When the service returns Unhealthy, though, the HTTP Status returned is 503 (Service Unavailable):
How to change the Health Check behavior
When registering the Health Check endpoint, you can also pass an object of type HealthCheckOptions.
One of the most interesting options it provides is changing the HTTP Status Code returned for each of the three health statuses (Healthy, Degraded and Unhealthy).
If we want to return a 599 status for Unhealthy, for example, we just do this:
app.UseEndpoints(endpoints =>
{
  var healthCheckOptions = new HealthCheckOptions();
  healthCheckOptions.ResultStatusCodes[HealthStatus.Unhealthy] = 599;
  endpoints.MapHealthChecks("/health", healthCheckOptions);
});
Another option is to provide a filter that dynamically decides which Health Checks will run:
app.UseEndpoints(endpoints =>
{
  var healthCheckOptions = new HealthCheckOptions();
  // this example isn't exactly realistic :)
  healthCheckOptions.Predicate = registration => registration.Name.StartsWith("M");
  endpoints.MapHealthChecks("/health", healthCheckOptions);
});
We can also customize the response. Below is an example setup that returns JSON, but we could just as easily build an HTML report page:
app.UseEndpoints(endpoints =>
{
  var healthCheckOptions = new HealthCheckOptions();
  healthCheckOptions.ResponseWriter = async (context, report) =>
  {
      context.Response.ContentType = "application/json";

      var result = JsonConvert.SerializeObject(new
      {
          status = report.Status.ToString(),
          errors = report.Entries
              .Select(e => new
              {
                  key = e.Key,
                  value = e.Value.Status.ToString()
              })
      });
      await context.Response.WriteAsync(result);
  };
  endpoints.MapHealthChecks("/health", healthCheckOptions);
});
Luckily, the AspNetCore.HealthChecks.UI library already does the work of generating a monitoring dashboard. I won’t go into the details of setting up that tool in this article, but it’s quite simple.