
Visualizing hundreds of repositories with Gource
Learn how to visualize the work of hundreds of people across hundreds of Git repositories with Gource.
Visualizing a repository with Gource is pretty simple. Just run gource inside the repository and voilà. But what if we want a single visualization of hundreds of repositories at once? That’s the scenario I explore in this post.

Organizations that work with microservices tend to spread development across a large number of small repositories. Every microservice and every microfrontend lives in its own repository. And that’s before counting libraries and other supporting repositories.
Rendering multiple repositories
Last year I wrote a post about the basics of Gource. Below, I show how to scale that approach to hundreds of repositories.
Custom logs
Gource makes it easy to visualize a single repository. But if we want it to render several repositories at the same time, we have to “trick” it by building a unified history that simulates one Mega Repository.
This strategy is covered in the Gource documentation. With the following command, we can export each repository’s change history in a format that’s easy to work with:
gource --output-custom-log log1.txt repo // <1>log1.txtis the custom log file generated from the history of the repository in therepofolder
You’ll need to run this command separately for each repository you want in the visualization. That means you’ll have to clone every one of them. This is the tedious part of the process, and the one most worth automating.
You can do it in whatever scripting language you like. In my case, my colleague Gustavo Baroni Bruder and I automated the process in Python, using the Azure DevOps API.
Cloning 165 repositories from Azure DevOps
At Ambev Tech we use Azure DevOps to organize our work. As an example, I’ll walk through the steps we used to clone all 165 repositories needed for the visualization, using the Azure DevOps API.
First, we need the IDs of the projects involved. If you work with a single project, you can easily grab it from the project URL when you open it in the Azure DevOps portal. If you have several, this section shows one way to automate that.
Lists every project in an Azure DevOps organization
projects_url f'https://dev.azure.com/{organization}/_apis/projects?api-version=6.0' // <1>
result = get_from_azure_devops(projects_url)
organization_data = json.loads(result) // <2>

def encode_PAT(pat: str):
  ### PAT = Personal Access Token

  pat_bytes = pat.encode('ascii')
  base64_bytes = base64.b64encode(pat_bytes)
  base64_message = base64_bytes.decode('ascii')
  return base64_message

def get_from_azure_devops(url: str):
  personal_access_token = os.getenv('PERSONAL_ACCESS_TOKEN') // <3>
  encoded_token = encode_PAT(f':{PERSONAL_ACCESS_TOKEN}')
  authorization = f'Authorization: Basic {ENCODED_TOKEN}'

  req = urllib.request.Request(url, headers={'Authorization': f'Basic {ENCODED_TOKEN}'})
  with urllib.request.urlopen(req) as response:
return response.read()- This endpoint returns the organization’s project list, respecting the permissions of the supplied token
- You can see the format of the returned JSON further below
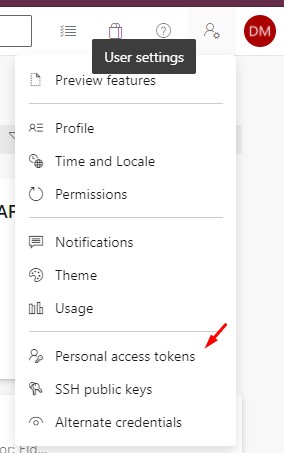
- The PAT, or personal access token, can be generated in the Azure DevOps portal, as shown in the image below:
{
"count": 5,
"value": [
  {
    "id": "6525b4fe-aa1c-4391-8e8d-1d400506f1ab",
    "name": "PROJETO-X",
    "description": "Descrição do projeto",
    "url": "https://dev.azure.com/ORGANIZATION-NAME/_apis/projects/6525b4fe-aa1c-4391-8e8d-1d400506f1ab",
    "state": "wellFormed",
    "revision": 25130,
    "visibility": "private",
    "lastUpdateTime": "2021-06-28T14:54:17.09Z"
  }
  //...
]
}
With that information, we can list every repository under each of the organization’s projects:
Lists every repository in an Azure DevOps project
repositories_by_project = {}

projects = list(organization_data["value"])
for project in projects:
  project_name = project["name"]
  project_repositories_url = f'https://dev.azure.com/{organization}/{project}/_apis/git/repositories?api-version=6.0'
  result = get_from_azure_devops(project_repositories_url)
  repositories_data = json.loads(result)

  repositories = [ // <1>
      {'name': repository['name'], 'url': repository['remoteUrl']}
      for repository in repositories_data["value"]
  ]
repositories_by_project[project_name] = repositories // <2>- From the returned payload, we extract only what we need to clone the repositories: name and url
- We store all the relevant information in a dictionary with the structure below
Dictionary mapping projects to Git repositories
{
"PROJETO-1": [
  {
    "name": "repositorio1",
    "url": "https://NOME-ORGANIZACAO@dev.azure.com/NOME-ORGANIZACAO/NOME-PROJETO/_git/repositorio1"
  },
  {
    "name": "repositorio2",
    "url": "https://NOME-ORGANIZACAO@dev.azure.com/NOME-ORGANIZACAO/NOME-PROJETO/_git/repositorio2"
  },
]
}
Now we have everything we need to clone all the repositories. Continuing our Python automation, we can run the Git CLI as a subprocess.
Cloning the repositories
# continuing from the previous snippets
for project in repositories_by_project:
    for repository in repositories_by_project[project]:
        remote_url = repository["url"]
        name = repository["name"]
        try_clone_repository(remote_url, name)


def execute_in_shell(command: str): // <1>
    popen = Popen(command, stdout=PIPE, universal_newlines=True)
    for stdout_line in iter(popen.stdout.readline, ""):
        yield stdout_line
    popen.stdout.close()
    return_code = popen.wait()
    if return_code:
        raise CalledProcessError(return_code, command)


def try_clone_repository(git_url: str, repository_name: str):
    try:
        target_directory = f'./repositories/{repository_name}' // <2>
        if os.path.isdir(target_directory) and len(os.listdir(target_directory)) > 0:
            print(f'{target_directory} already cloned. Skipping.')
            return

        git_command = f'git clone "{git_url}" {target_directory}'
        print(f'Executing command: {git_command}')

        for path in execute_in_shell(git_command):
            print(path, end="")
    except Exception as exception:
print(exception)- Returns the process output, which makes debugging easier
- Clones each repository into the
repositoriesfolder
Once that’s done, every repository is cloned. Now we can move on to working with the history.
Processing the Git change histories
Running gource --output-custom-log log1.txt repo produces a CSV in a very simple format.
A repository’s history in the custom format
**1629995348**|Nome usuário 1|A|/.gitignore // <1>
1629995348|**Nome usuário 1**|A|/README.md // <2>
1630016091|usuario.2|**M**|/.gitignore // <3>
1630016091|usuario.2|A|**/backend/.editorconfig** // <4>
1630016091|usuario.2|A|/backend/.gitignore
1630016091|usuario.2|A|/backend/ServiceX.sln
1630016091|usuario.2|A|/backend/NuGet.Config
1630016091|usuario.2|A|/backend/devops/docker/Dockerfile
1630016091|usuario.2|D|/backend/devops/helm/servicex/.helmignore
1630016091|usuario.2|D|/backend/devops/helm/servicex/Chart.yaml
- The first column is the commit timestamp
- The second column is the user name. The same person may show up several times if they used different Git settings over time.
- The third column describes the action: A=addition, M=modification, D=deletion. Gource uses this to color the beams showing each user’s activity.
- The last column holds the path of the changed file, relative to the repository root. This path determines how the file tree is drawn in the Gource visualization.
The next step is to merge all the repositories. Since we already have every repository cloned, we can add log rendering for each one to our Python script, and merge them afterwards.
Rendering the logs from the repositories
# continuing from the previous snippets
for project in repositories_by_project:
    for repository in repositories_by_project[project]:
        remote_url = repository["url"]
        name = repository["name"]
        try_clone_repository(remote_url, name)
        render_custom_log(repository, project) // <1>

def render_custom_log(repository_name, project_name):
    print(f'Generating log file for repository {repository_name}.txt')
    try:
        target_file = f'./render/{repository_name}.txt'
        if os.path.isfile(target_file):
            print(f'Repository {repository} already processed')
            return

        if not os.path.isdir(repository_directory):
            raise Exception(f'Unable to render custom log for repository {repository_name}. {repository_directory} not found.')
        else:
            files = os.listdir(repository_directory)
            has_files = len(files) > 1  # every repository has at least .git
            if not has_files:
                print(f'Skipping log genereation for repository {repository_name}. Repository is empty')
                return

        gource_command = f'gource --output-custom-log "{target_file}" "./repositories/{repository_name}"' // <2>
        proc = Popen(gource_command, stdout=PIPE, stderr=PIPE, shell=True)
        out, err = proc.communicate()

        if proc.returncode == 0:
            print(f'Command executed successfully: {gource_command}')

            sleep(1)  # ensure that the generated file is closed
            inject_repository_name(target_file, project_name) // <1>


def inject_repository_name(file_path, project_name): // <2>
    with open(file_path, 'r') as file_read:
        content = file_read.read()
        with open(file_path, 'w') as file:
            new_content = content \
                .replace('|A|', f'|A|/{project_name}') \
                .replace('|M|', f'|M|/{project_name}') \
                .replace('|D|', f'|D|/{project_name}')
file.write(new_content)- Once we confirm the file was generated, we can manipulate it
- This function does the same as that
sedcommand, adding the repository name as the root folder of every change in the file.
Now we’re ready to merge everything into a single repository and build our Mega Repository. One way to do it is to print the contents of every file, sort them, and dump the result into one combined file holding the history of all repositories.
Something along these lines, processed in three phases:
- All logs are printed
- They are sorted numerically (the first column, being a timestamp, helps)
- The logs are combined into a single coherent history
Merging the history in the shell
cat log1.txt log2.txt log3.txt | sort -n > combined.txtBut since we’re automating the whole process in Python, let’s carry on with our automation.
Generating the combined history
  custom_log_files = os.listdir('./render') // <1>
  all_lines = []
  for log_file in custom_log_files:
      lines = read_lines(f'./render/{log_file}')
      all_lines.extend(lines) // <2>
  all_lines.sort() // <3>

  combined_file_path = './combined.txt'
  print(f'Generating file {combined_file_path}')
  with open(f'{combined_file_path}', mode='w', newline='') as file:
      file.writelines(all_lines) // <4>
print(f'File {combined_file_path} successfully generated')- First, we find every custom log file generated in the previous step.
- Then we add the contents of all of them to a single list.
- With the whole history in memory, we can sort it.
- Finally, we save the combined history to a new
combined.txtfile. This file is the input for the next step.
Rendering the video
The next step is to generate our visualization with Gource.
Dica
Ideally, run this step on a machine with plenty of disk space and, preferably, a lot of horsepower. For reference, the 5-minute visualization we generated from one year of history across 165 repositories produced a 54GB file.
The parameters will vary a lot depending on the size of the visualization, what you want to emphasize, and whatever other characteristics you’re after.
Command to generate the visualization with Gource in interactive mode
gource "combined.txt" -1920x1080 \
  --seconds-per-day 0.4 \ // <1>
  --camera-mode track \
  --multi-sampling \
  --padding 1.1 \
  --elasticity 0.005 \
  --bloom-multiplier 1 --bloom-intensity 0.1 \
  --stop-at-end \
  --highlight-users \
  --hide mouse,progress,filenames \
  --file-idle-time 13 \
  --max-files 0 \
  --background-colour 000000 \
  --start-date '2021-01-01 00:00:00' \
  --title "Retrospectiva Hercules - 01/2021 a 12/2021" \
  --date-format "%d/%m/%y" \
  --font-size 18 \
  --dir-name-depth 3 \
  --logo "logo.jpg" \
  --output-framerate 30 \ // <2>
  --file-font-size 4 \
  --highlight-colour 0bc7ed \ // <3>
  --max-user-speed 500 \
--output-ppm-stream ./output.ppm // <4>- The most important parameter is probably
seconds-per-day. It’s what determines the length of the video. - Pay attention to the framerate, since it affects the video quality.
- It’s a nice touch to highlight user names with a font color different from the file system. Here, I used blue.
- The output uses the PPM codec, also known as Portable Pixel Map
You’ll probably need several rounds of tweaking before you get a result you’re happy with. This is the fun part, and it takes a lot of exploring through Gource’s countless configuration options.
Dica
gource -H prints the full list of options, and the Gource Wiki has plenty of examples and explanations for them.
The last step is to convert the video to a format that’s easier to work with.
Converting the video to .mp4
To convert the video to .mp4, the most practical option I found was an avconv Docker image.
Command to convert .ppm to .mp4
docker run -it \
  -v .:/files \ // <1>
  -v .:/home/docker \
  --rm=true -u="1000" \
  jedimonkey/avconv avconv -y \
  -r 30 \ // <2>
  -f image2pipe \
  -vcodec ppm \
  -i /files/output.ppm \
  -b 32768k \
/files/output.mp4 // <3>- We need to mount the directory containing our .ppm file as a volume
- The framerate here must match the one used when generating the .ppm
- This is the output file
If all goes well, we’ll have our finished file.
Results
Below is the visualization produced at the end of this process.
The big advantage of automating this process is that it becomes repeatable. In a large company like Ambev Tech, with hundreds of teams and systems, other teams can take advantage of this automation too.
Enjoyed this post? Leave a comment. Let’s share experiences!