Building a CLI with Gluegun
Learn how to build a command-line app with Gluegun, and see how I used it to build Replicante, my newest open-source project.
When I started building Replicante (the first project of mine I consider truly open source), I needed a tool that would let me build a CLI (command line interface) that looked good, was easy to use, and easy to develop. I found all of that in Gluegun.
Gluegun?
Gluegun is a toolkit for building command-line apps in TypeScript. The name fits how it’s built: it masterfully glues together a set of excellent libraries to solve the main problems a command-line app runs into.
It ships with tools for every one of these problem areas:
- parameters - for working with command-line parameters (arguments and options), using yargs-parser or enquirer
- templates - for generating files from templates, using ejs
- patching - for patching files by manipulating their contents
- filesystem - for moving files and folders around, using fs-jetpack
- system - for running other command-line scripts, using execa or cross-spawn
- http - for talking to APIs, using axios and apisauce
- prompt - for building prompts with autocomplete
- print - for printing colored text and tables, using colors, ora or cli-table3
- semver - for working with semantic versioning, using semver
- strings - for manipulating strings and template data, with a bunch of helper functions from pluralize
- packageManager - for installing NPM packages with Yarn or NPM
Another nice thing about Gluegun is its extensibility: it makes writing our own plugins and extensions really easy.
Who uses Gluegun?
A few heavyweight apps were built with Gluegun. Among them are the AWS Amplify CLI, for building serverless applications, and the Ignite CLI, a starter kit and CLI for React Native.
Creating our first app
Some of the examples I’ll show in the rest of this tutorial were adapted and simplified from the Replicante code.
But first we need to install Gluegun, and that’s easy. Just install it with Yarn:
yarn global add gluegunNow we’re ready to create our first app with the gluegun new <projectname> command. For Replicante, I ran:
gluegun new replicanteGluegun will ask whether we want to create the app in Modern JavaScript (Node 8.2+) or TypeScript. Personally, I think TypeScript is the better option, since it comes with a working build pipeline out of the box.

Now you can navigate to your new app’s folder, in my case replicante, with ‘cd replicante’, and create a symbolic link to the executable with the yarn link command.
From then on, you can run your app using the tool’s own name. In my case, if I run the replicante command, I see something like this:

The structure of a Gluegun project
The project the tool generates for us follows a structure that’s very easy to follow:
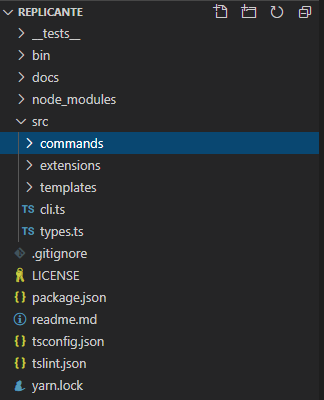
In the commands folder, Gluegun ships two sample commands to help us out. The first one is generate, an example of generating files from EJS templates, which comes in handy in a variety of development scenarios, such as creating React components.
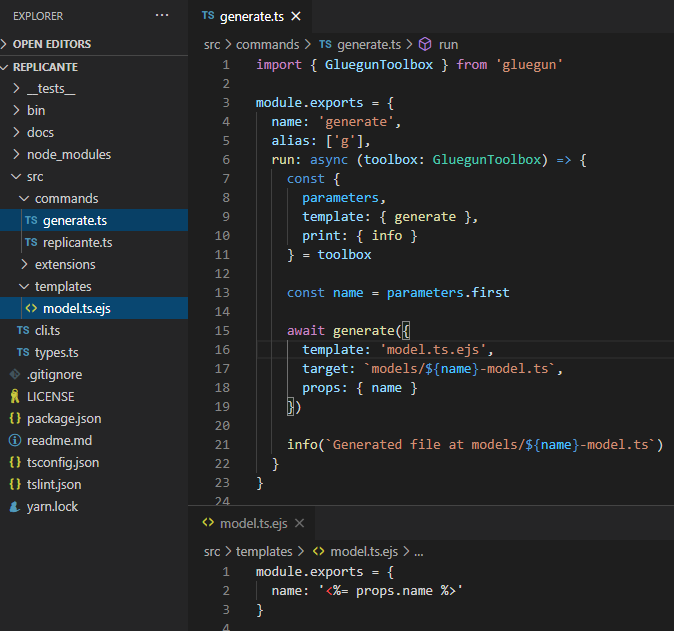
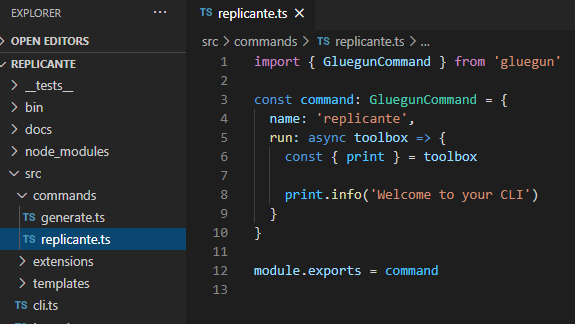
The second one is the replicante command itself, which we ran a moment ago, and which prints the message “Welcome to your CLI”.
An important piece, where the magic begins, is the cli.ts file. It’s responsible for instantiating the runtime that will run the application. At this stage, we can configure plugins, source locations, and enable default commands such as help and version:
const { build } = require('gluegun')

/**
* Create the cli and kick it off
*/
async function run(argv) {
// create a CLI runtime
const cli = build()
  .brand('replicante')
  .src(__dirname)
  .plugins('./node_modules', { matching: 'replicante-*', hidden: true })
  .help() // provides default for help, h, --help, -h
  .version() // provides default for version, v, --version, -v
  .create()
// enable the following method if you'd like to skip loading one of these core extensions
// this can improve performance if they're not necessary for your project:
// .exclude(['meta', 'strings', 'print', 'filesystem', 'semver', 'system', 'prompt', 'http', 'template', 'patching', 'package-manager'])
const toolbox = await cli.run(argv)

// send it back (for testing, mostly)
return toolbox
}

module.exports = { run }
It also generates a few basic Jest test scenarios in the __tests__/cli-integration.test.ts file, covering help, version, and template-based file generation. A real time-saver to get started:
const { system, filesystem } = require('gluegun')

const src = filesystem.path(__dirname, '..')

const cli = async cmd =>
system.run('node ' + filesystem.path(src, 'bin', 'replicante') + ` ${cmd}`)

test('outputs version', async () => {
const output = await cli('--version')
expect(output).toContain('0.0.1')
})

test('outputs help', async () => {
const output = await cli('--help')
expect(output).toContain('0.0.1')
})

test('generates file', async () => {
const output = await cli('generate foo')

expect(output).toContain('Generated file at models/foo-model.ts')
const foomodel = filesystem.read('models/foo-model.ts')

expect(foomodel).toContain(`module.exports = {`)
expect(foomodel).toContain(`name: 'foo'`)

// cleanup artifact
filesystem.remove('models')
})
Building Replicante
In this section, I’ll talk a bit about how I used Gluegun to make Replicante a reality.
In short, Replicante is a project super-copier. You tell it which of your projects you want to base the new one on, and which transformations to apply (usually replacing specific terms and namespaces), and it generates a new project with those changes applied. Very handy for freelancers who want to reuse past projects in their new ones.
I think it’s worth starting with cli.ts and looking at how it turned out:
const { build } = require('gluegun')

async function run(argv) {
// create a CLI runtime
const cli = build()
  .brand('replicante')
  .src(__dirname)
  .plugins('./node_modules', { matching: 'replicante-*', hidden: true })
  .help() // provides default for help, h, --help, -h
  .version() // provides default for version, v, --version, -v
  .defaultCommand()
  .exclude(['semver', 'prompt', 'http', 'package-manager'])
  .create()

// run it
const toolbox = await cli.run(argv)

// send it back (for testing, mostly)
return toolbox
}

module.exports = { run }
The startup code above has a few differences from the first example I showed earlier.
The first change is the added defaultCommand() call. I added it so I could remove the replicante.ts command script that came with the app. In its place, Gluegun takes care of printing the welcome message and pointing the user to the help command:
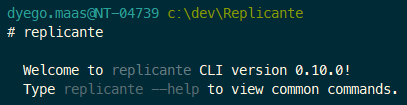
Next, I added the exclude call, passing it a list of Gluegun toolkit modules the Replicante CLI doesn’t use and that shouldn’t be loaded when the app starts. That way it loads faster and the user experience improves significantly.
The full list of modules you can exclude already comes as a comment when cli.ts is created, and it’s there for reference, but for simplicity’s sake I’ll repeat it here:
.exclude(['meta', 'strings', 'print', 'filesystem', 'semver',
'system', 'prompt', 'http', 'template', 'patching', 'package-manager'])
Then I created a new command, called create.ts, in the commands folder. In the command declaration, I set its name and description.
import { GluegunCommand, filesystem, strings } from 'gluegun'

const command: GluegunCommand = {
name: 'create',
description:'Create a REPLICANT by applying the RECIPE instructions to the SAMPLE',
run: async toolbox => {
  //...
}
}
Parameters
The create command needs three parameters to work:
- The template project directory
- The recipe file (JSON) with the transformation instructions
- The target directory (optional)
To capture those parameters, I used Gluegun’s features:
run: async toolbox => {
const { parameters, print } = toolbox

// Capture the command-line parameters
const templatePath = parameters.first
const recipePath = parameters.second
const targetPath = parameters.options.target || './output'

// Basic validation
if (!templatePath || !recipePath) {
  print.error('Usage: replicante create <template-path> <recipe-path> [--target=<output-path>]')
  return
}

// Check that the files exist
if (!filesystem.exists(templatePath)) {
  print.error(`Template path not found: ${templatePath}`)
  return
}

if (!filesystem.exists(recipePath)) {
  print.error(`Recipe file not found: ${recipePath}`)
  return
}

// Carry on with the replication logic...
}
Processing the recipe
The recipe file is a JSON file containing the transformation instructions. Gluegun makes reading and manipulating these files really easy:
// Read the recipe file
const recipe = filesystem.read(recipePath, 'json')

if (!recipe) {
print.error('Failed to read recipe file')
return
}

// Validate the recipe structure
if (!recipe.replicantName || !recipe.templateName) {
print.error('Invalid recipe: missing required fields')
return
}

print.info(`Creating replicant '${recipe.replicantName}' from template '${recipe.templateName}'`)
Copying and transforming files
The most interesting part is transforming the files. Gluegun offers excellent tools for file manipulation:
// Copy every file from the template to the target
await filesystem.copyAsync(templatePath, targetPath, {
matching: '**/*',
ignoring: recipe.ignoreArtifacts || []
})

// Apply the file name transformations
for (const replacement of recipe.fileNameReplacements || []) {
const files = filesystem.find(targetPath, {
  matching: `**/*${replacement.from}*`,
  files: true,
  directories: true
})

for (const file of files) {
  const newName = file.replace(replacement.from, replacement.to)
  await filesystem.moveAsync(file, newName)
}
}

// Apply the content transformations
for (const replacement of recipe.sourceCodeReplacements || []) {
const files = filesystem.find(targetPath, {
  matching: '**/*',
  files: true,
  ignoring: ['**/*.{png,jpg,jpeg,gif,ico,svg,woff,woff2,ttf,eot}']
})

for (const file of files) {
  const content = filesystem.read(file)
  if (content && content.includes(replacement.from)) {
    const newContent = content.replace(new RegExp(replacement.from, 'g'), replacement.to)
    filesystem.write(file, newContent)
  }
}
}
Visual feedback
Gluegun offers excellent tools for visual feedback, including spinners and colored messages:
const { print } = toolbox

// Start a spinner
const spinner = print.spin('Processing template...')

try {
// Do the processing
await processTemplate()

// Success
spinner.succeed('Template processed successfully!')
print.success(`Replicant '${recipe.replicantName}' created at ${targetPath}`)
} catch (error) {
// Error
spinner.fail('Failed to process template')
print.error(error.message)
}
Conclusion
Gluegun turned out to be an excellent tool for building CLIs in Node.js/TypeScript. It abstracts away much of the complexity of building command-line applications, so you can focus on the business logic.
Some advantages I found:
- Ease of use: a simple, intuitive API
- Extensibility: a flexible plugin system
- Built-in tools: everything you need comes included
- TypeScript: native support with full typing
- Testing: a built-in testing setup
If you’re thinking about building a CLI, I definitely recommend taking a look at Gluegun. It will save you a lot of time and effort, letting you focus on what really matters: solving the user’s problem.